Help Center
Documentation
1. Introduction
integraid allows you to quickly and easily connect all APIs directly in Salesforce, ensuring seamless integration of external systems and efficient data management.
The following documentation provides you with detailed information about the app and describes all the installation and configuration steps required to use integraid successfully.
Do you have any questions or need support with the setup? Simply send us an email to support@integraid.app and we will help you immediately.
1.1. Functions
integraid offers you the following functionalities directly in your own Salesforce environment:
- Uncomplicated and fast integration of external APIs directly into Salesforce.
- Easy communication of external systems with Salesforce, without additional middleware or complex integration solutions.
- Centralized and efficient data management ensures a consistent data flow between external systems and Salesforce.
All functionalities can be fully automated (depending on preference). Integraid and Salesforce-native automation options interlock seamlessly.
This list provides an overview. We will describe these functions individually and in detail below.
1.2. Requirements
integraid is designed exclusively for use in Salesforce. It is compatible with the following Salesforce editions: Platform, Enterprise, Unlimited.
There are restrictions with the Salesforce Professional Edition.
1.3. The integraid interface
The interface for configuring and using integraid consists exclusively of native Salesforce components. You will find the following tabs in the application:
| Tab | Description |
|---|---|
| Home | On the home page, you will find the current dashboards for your APIs linked via integraid. |
| Configurations | Using a "Configuration" data record created during configuration, you can control the basic settings and rules for the application. |
| Providers | Here you can create and manage your API interfaces. |
| Endpoints | Here you can create and manage the endpoints of your providers. |
| Mappings | Here you can create and manage your mappings. |
| Jobs | Here you can see a list of all the jobs you have created. |
| Results | List of most actions performed in the application with the respective result and information about any errors that may have occurred. |
This overview is intended to make the following documentation easier to understand. Details on how to use the individual tabs will be provided later.
2. Installation and Setup
A few preparatory steps are necessary before you can use integraid. These include installing the tool itself, of course, but also further configuration measures, which we describe in this chapter.
Note: When you purchase integraid, we offer a free setup service! Just send us an email at support@integraid.com.
2.1. Installation
integraid is installed via Salesforce AppExchange.
Click on the "Get It Now" button to start the installation process.
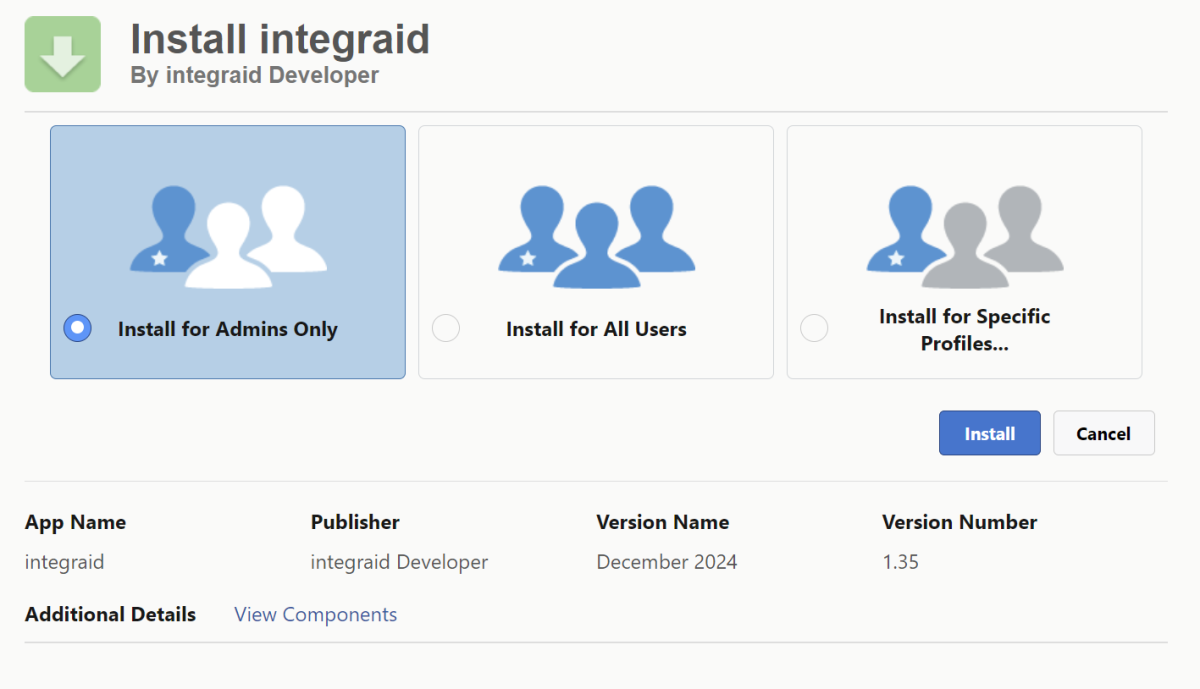
When you are on the installation page, select "For administrators only". This selection is necessary to prevent unauthorised users from accessing sensitive data.
 X
X
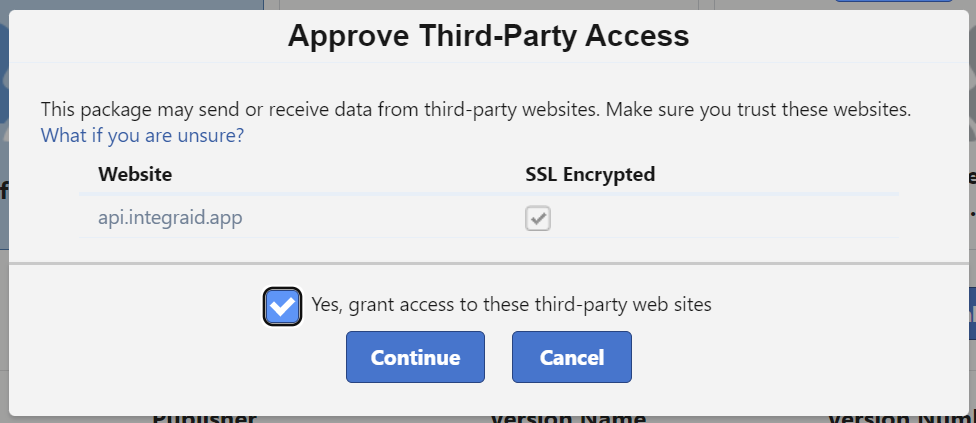
Click on "Install" and confirm the message "Yes, allow access to these third-party websites".
Background: During installation, permission must be granted to access various interfaces. In addition to the interface, communication with the integraid servers must also be established to ensure that the tool runs smoothly.
 X
X
 X
X
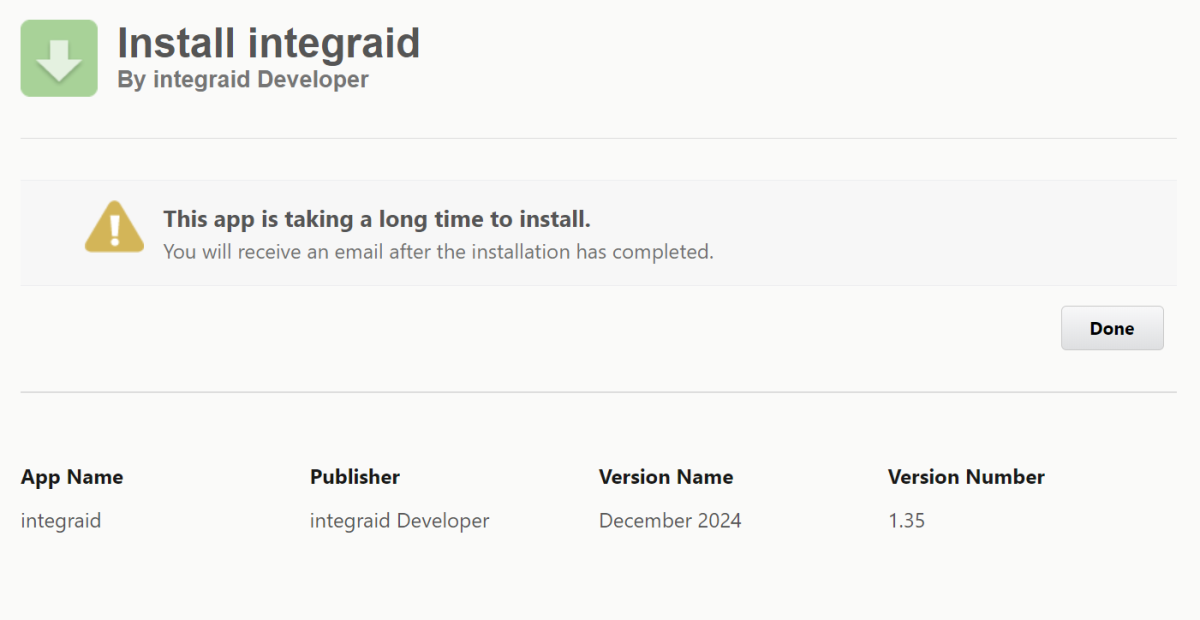
You may see a notification stating: "Installing this application will take some time. You will receive an email when the installation is complete." If you see this message for the first time, don't worry. Just click "Done." Salesforce will then notify you by email when the installation is complete.
 X
X
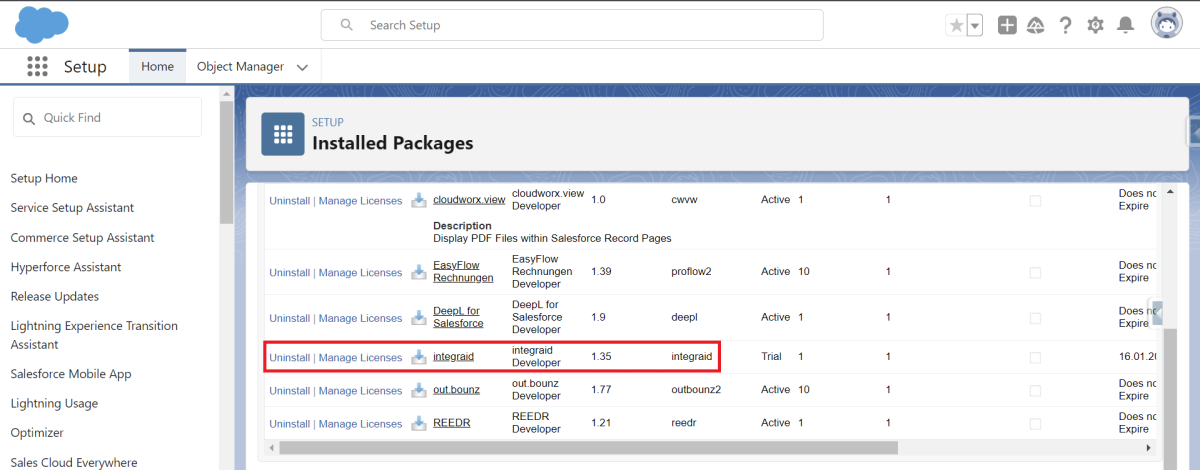
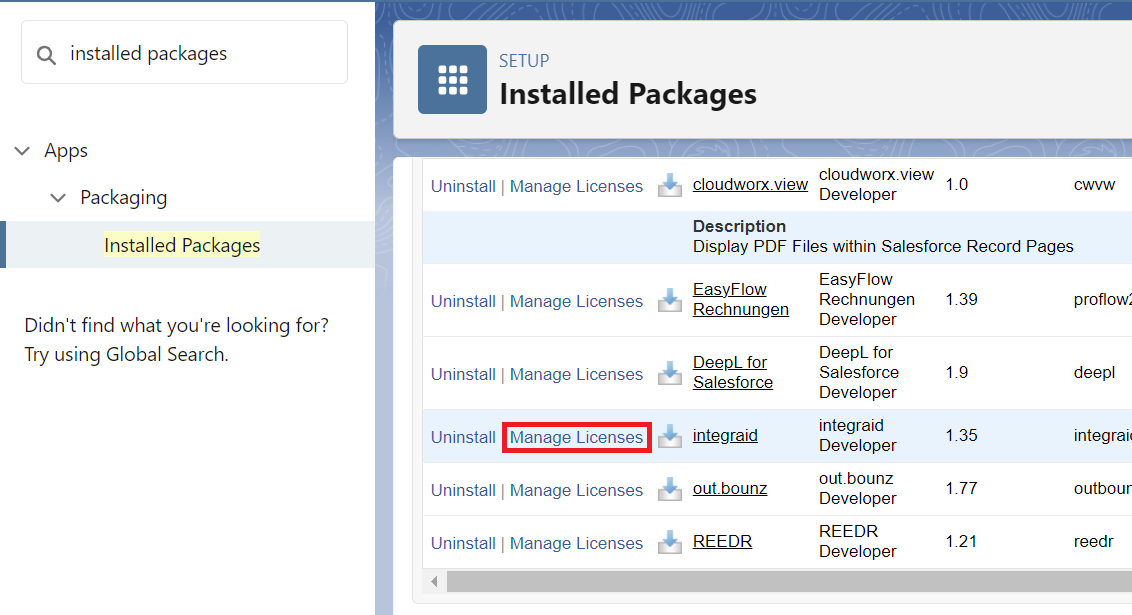
Once installation is complete, we recommend checking the installation in the "Packages" section under "Installed Packages" in Salesforce Setup.
 X
X
2.2. Granting of usage rights
No special rights are required for Salesforce users to use the application. Permissions to view the integraid data records must only be granted for configuration and debugging purposes. A basic distinction is made between two types of permissions:
- integraid licences*
- Salesforce permission sets*
integraid licences are assigned directly to the integraid package listed in the "Installed packages" section. To do this, click on the "Manage licences" button and assign the desired users.
 X
X
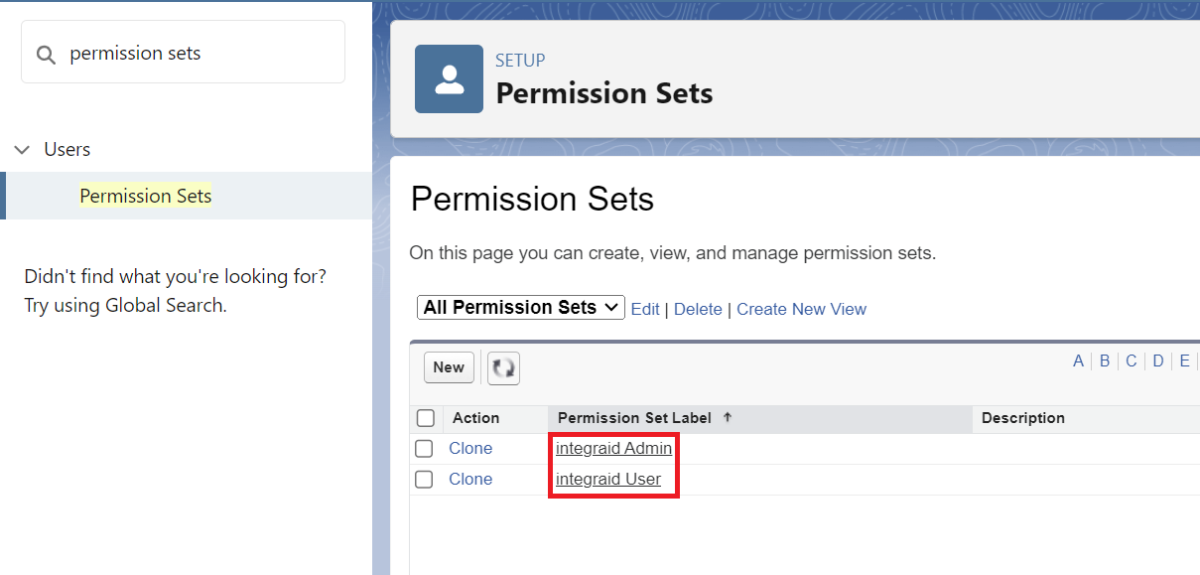
Salesforce permission sets, on the other hand, are assigned separately. In principle, integraid distinguishes between the following types of Salesforce permission sets:
- integraid Admin: for full administrative access to all areas of the application.
- integraid User: for user access.
To assign these permission sets, search for "Permission sets" in the setup.
Search the list for "integraid Admin" and "integraid User" and click on the respective set of permissions that you want to assign to a user.
 X
X
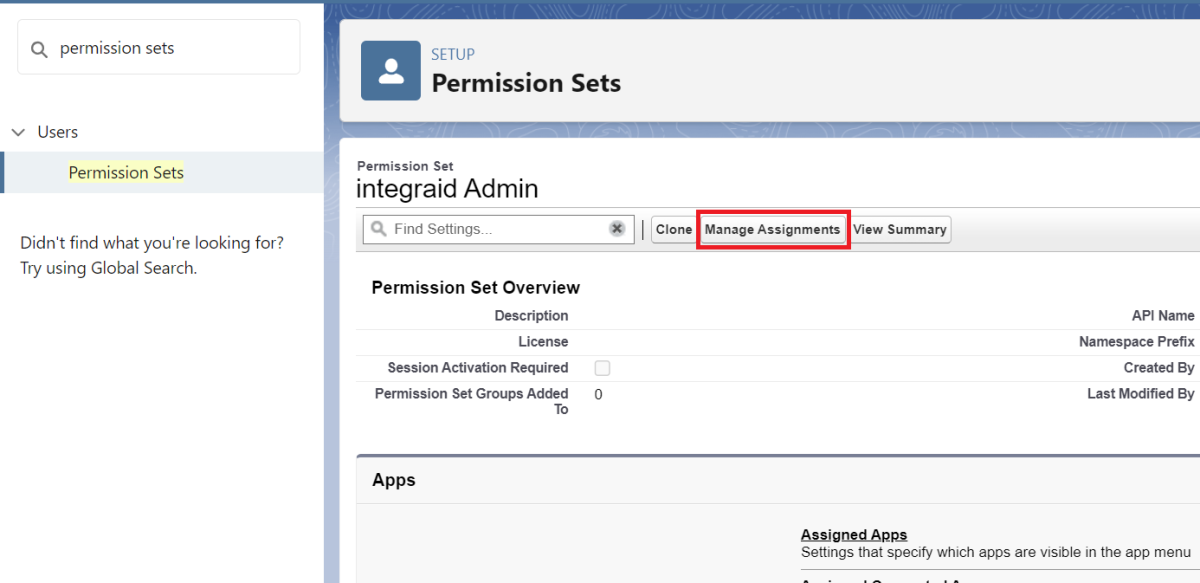
Go to "Manage assignments" and add the desired users by ticking the checkbox.
 X
X
IMPORTANT: It is also essential to enable the dashboards and reports that come standard with integraid. To do this, please switch to the standard tabs for "Reports" and "Dashboards" in the Salesforce interface and, in the sharing settings of the "integraid" folder added during the installation of integraid, share it with the group of all internal users. This sharing option can be found as follows: Search using the search function Reports or Dashboards > All folders > integraid > Share (using the arrow function on the right). If this step is omitted, the integraid app home screen cannot be displayed correctly for users without an administrator licence.
2.3. Activating the Record Pages
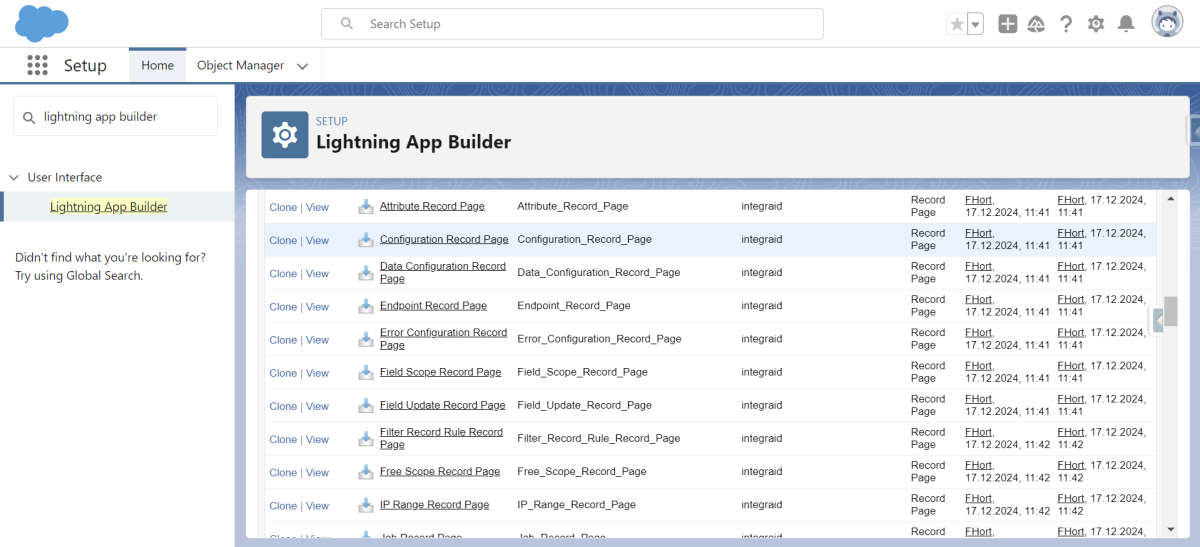
Unfortunately, Salesforce does not allow the activation of Record Pages when using Record Types during the installation of applications such as integraid. This must therefore be done manually once after installation. Activation is essential in order to be able to use all of integraid's functions to their full extent.
Specifically, this affects the objects "Scope" and "Record Rule".
You can find these in the setup. Enter "Lightning App Builder" or "Lightning Application Generator" in the search bar.
 X
X
You can assign the objects in detail as follows:
Click on the page > Display > Activation > Assign to applications, record type and profiles > select all apps that are used > Continue > Desktop and phone > Continue > select the respective record type > Continue > Select all profiles > Save.
Activate the following record pages:
| Object | Page | Record Type |
|---|---|---|
| Scope | Field Scope Record Page | Field |
| Free Scope Record Page | Free | |
| List Scope Record Page | List | |
| Primary Scope Record Page | Primary | |
| Record Rule | Filter Record Rule Record Page | Filter |
| Limit Record Rule Record Page | Limit | |
| Order Record Rule Record Page | Order |
2.4. Configuration
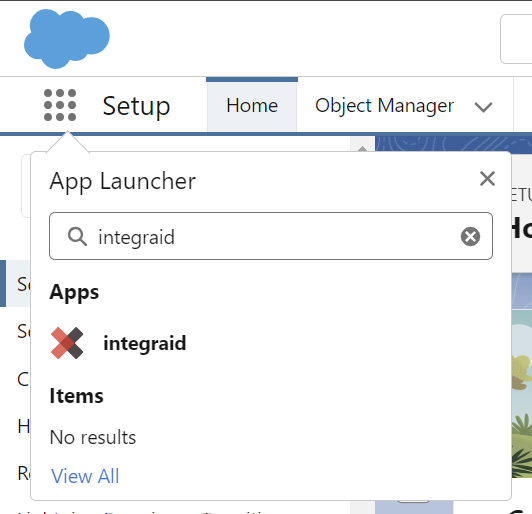
Search for the "integraid" application in the App Launcher* or using the search function.
 X
X
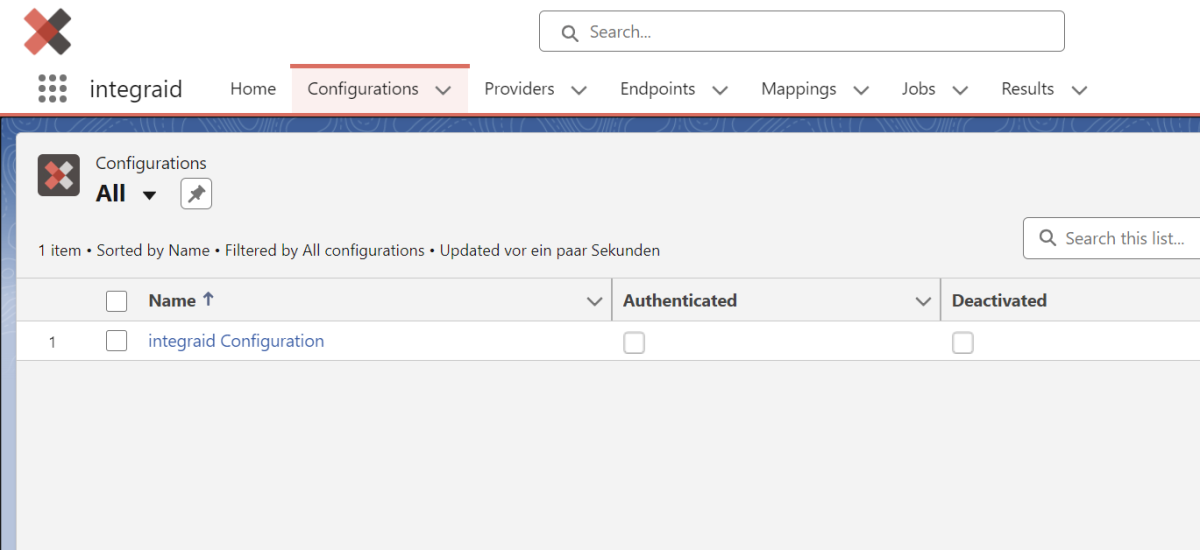
Switch to the "Configurations" tab in the app. Here you will find a configuration data set. In this data set, you must fill in the fields with the necessary information to configure integraid.
 X
X
The following fields exist based on the configuration data record:
| Field | Required | Description |
|---|---|---|
| Authenticated | Required | Indicates whether integraid is authenticated with Salesforce. |
| Error Email Address | Optional | In this field, you can enter an email address to which notifications will be sent in the event of an error. |
| Request Limit | Optional | Here you can define the maximum number of API requests that integraid will use per day. |
| Deactivated | Optional | Should not be checked by default. This setting allows integraid to be completely deactivated. |
| Debug Mode | Optional | This setting is used for advanced display of communication details between Salesforce and the external interface. |
2.5. Trial Version
You can try integraid free of charge for 30 days and perform 250 API operations. You do not need to provide any account details. After 30 days, the trial period expires automatically and you will no longer be able to access integraid.
If you would like to test integraid in a sandbox, the installation process is exactly the same as in the live environment. The only exception is if the sandbox is a partial copy in which the configuration data set has been transferred. In this case, you must use the "Reset Configuration" button in the configuration data set to ensure smooth operation.
2.6. Book licences
After setting up the configuration data record, you must complete the purchase process.
This step is particularly important to ensure that you can use integraid!
The licence fees for using integraid will be collected by direct debit from the account you specify. You can enter the relevant information as follows:
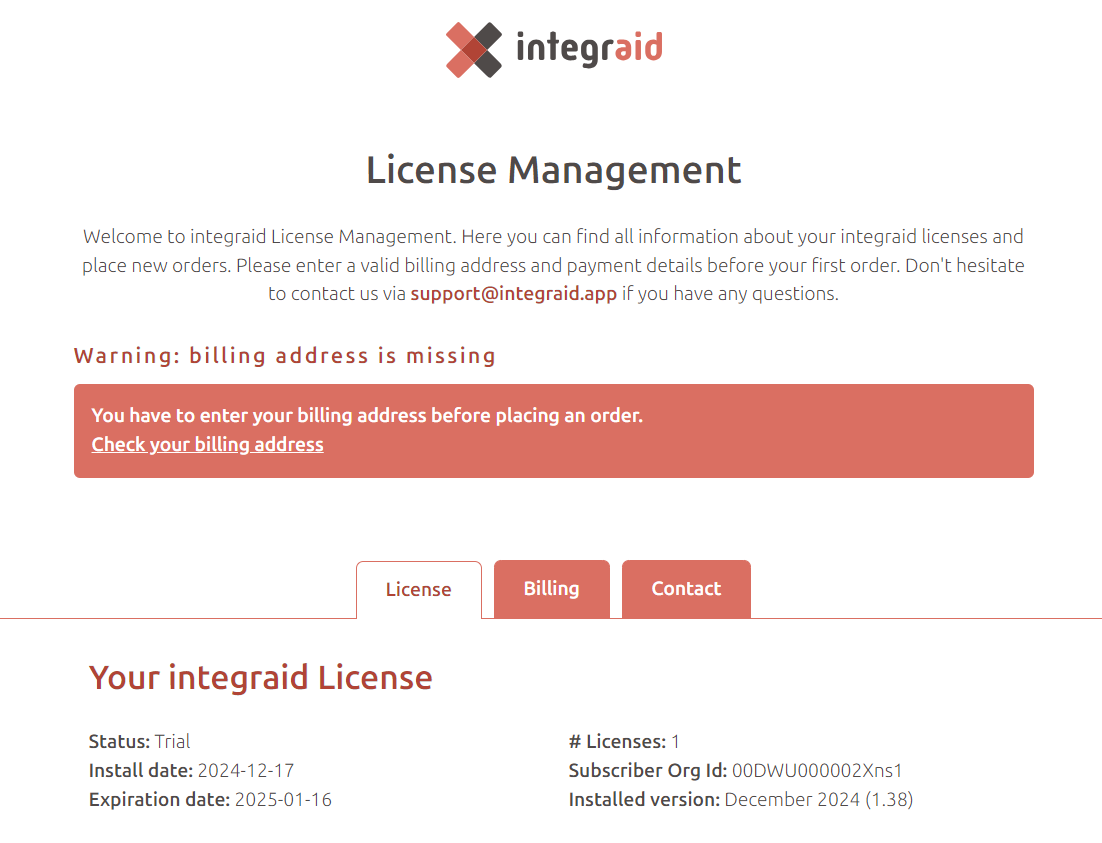
- In the integraid app, you will find the "Manage Licences" button at the configuration data set level. Clicking on this button opens a login page for your licence management area. In this customer portal, you will find all important data relating to your integraid licences and payment information, as well as the option to add further licences with a single click.
- To log in, you will receive an individual code by email, which you need to enter in the login screen. After logging in, the overview page opens with information about what details you need to provide us with so that you can use integraid in the future.
- By clicking on "Check your billing address", you can enter a valid billing address. Then click on "Check your SEPA direct debit mandate" to issue a valid SEPA direct debit mandate. You will also find the input fields for your data at the bottom of the "Billing" and "Payment" tabs.
Once you have entered and saved the necessary data, you will receive a confirmation email from us and a document containing all the information relating to your SEPA direct debit mandate.
Please note: The confirmation email will be sent to the email address provided during the integraid download in Salesforce AppExchange. If you do not receive this email, please send us a message at support@integraid.com.
 X
X
2.7. Authentication
Once the configuration data set has been created, you must authenticate yourself with the integraid servers in order to use all available functions.
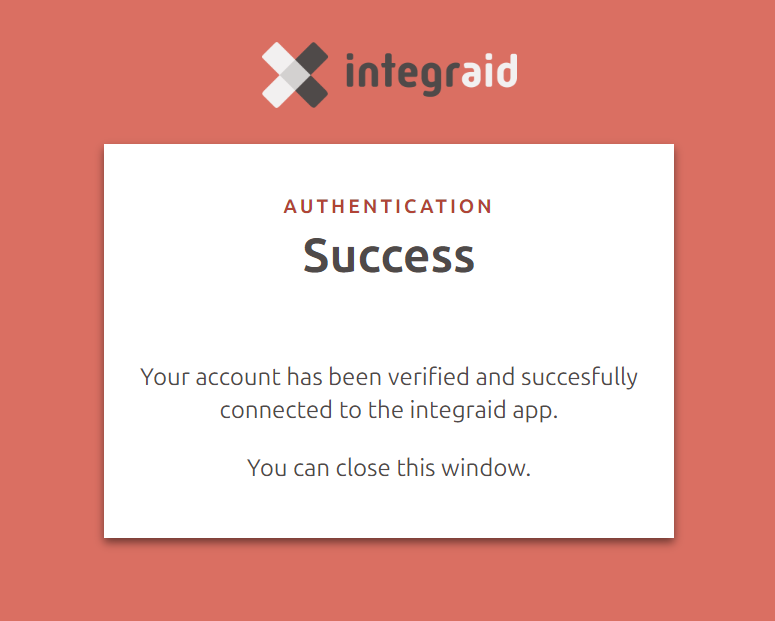
This authentication is performed once. Simply click on the ‘Authenticate’ button in the created data set.
After successful authentication (which may need to be completed by confirming the OAuth2 query), the user is redirected to a results page. If authentication is successful, this is indicated by a tick in the ‘Authenticated’ field.
In the event of successful authentication, the following message also appears:
 X
X
Note: For advanced security, we strongly recommend enabling Login IP Ranges for the integration user's profile (the user who is authenticating). This restricts access to this user from our server only. The IP address ranges to be defined are:
- IP Start & End Address: 92.205.105.248
- IP Start & End Address: 2a00:1169:11d:7b40::
3. Operational use of integraid
In this chapter, we describe how you can get the most out of integraid. This also requires configuration measures which, like the configurations already completed, only need to be carried out once.
We show you the settings using use cases to make the configuration clearer. Of course, you can configure and use integraid for your own individual use case and with your own custom objects.
3.1. Providers
A provider is the base URL of the API we want to access. You can add a provider by clicking on the ‘New’ button at the top right of the "Providers" tab.
An interface for creating a "Provider" record will open. Fill in the following fields for the configuration:
| Field | Required | Description |
|---|---|---|
| Name | Required | Your own, freely selectable name for the provider. |
| Base URL | Optional | Enter the base URL of the API that is to be addressed here. |
Note: If no base URL is defined in the provider, the entire URL must be specified in the endpoints.
Now you need to configure the authorisation for the API by clicking on the "Authorisation" button. You can choose between "URL", "Basic", "Token" or "OAuth 2.0" authorisation. You can find out which method should be used to authorise the API in the respective interface documentation.
3.1.1. URL
URL authorisation is performed by appending an API key directly to the URL as a parameter.
The following fields are available:
| Field | Description |
|---|---|
| Appendix | In this field, enter the parameter used to transfer the API key, e.g. api_key=<API - key>. |
3.1.2. Basic
Basic authentication uses a combination of username and password to access the API.
The following fields are available:
| Field | Description |
|---|---|
| Username | Enter the username for API access here. |
| Password | Enter the corresponding password. |
3.1.3. Token
This method uses a token that is sent in the header of the API request.
The following fields are available when String is selected as the token type:
| Field | Description |
|---|---|
| Header | The name of the HTTP header under which the token is sent, e.g. Authorisation. |
| Header Prefix | Optional prefix that precedes the actual token, e.g. Bearer. |
| Token | The fixed access token (e.g. API key or auth token) that is sent with every request. |
The following fields are available when JWT is selected as the token type:
| Field | Description |
|---|---|
| Header | The name of the HTTP header under which the token is sent, e.g. Authorisation. |
| Header Prefix | Optional prefix that precedes the actual token, e.g. Bearer. |
| Issuer | The "issuer" of the token – i.e. who created the token. In JWTs, this is often a unique identifier such as a client ID or a domain name. |
| Subject | The "user" for whom the token is issued. This can be a user ID or a system name, for example. |
| Audience | The target group of the token, i.e. the service/API for which the token is intended. |
| Algorithm | Determines the method used to sign the JWT. HS256–512 use a shared secret key (HMAC), RS256–512 use an asymmetric RSA key pair. |
| Private Key | Used to sign the JWT. For HS: Simple secret text. For RS: Unencrypted private key in PKCS#8 format (no password protection). |
3.1.4. OAuth2.0
Token Type: Select the data type of the token here (string, JWT, etc.).
OAuth 2.0 is a more complex process that is suitable for APIs with increased security requirements and offers advanced authorisation features.
The following fields are available when "Authorisation Code" is selected as the grant type:
| Field | Description |
|---|---|
| Header Prefix | Prefix for the access token in the header, e.g. Bearer. |
| Token URL | URL of the OAuth server where the access token is requested by entering the username and password. |
| Refresh URL | URL for renewing the access token using the refresh token. |
| Authorize URL | URL to which the user is redirected for initial authorisation. |
| Use PKCE | Enable if the authorisation code flow with PKCE is used – recommended for mobile applications. |
| Client Id | The client ID of your application – provided by the API provider. |
| Client Secret | The client secret (password) used to authenticate your client. |
| Credentials Location | Specifies where the client ID and client secret are transmitted during the token request: in the body or in the header. |
| Scope | Specifies to which resources the API has permissions to access. Mostly used for large API providers. Multiple Scopes can be specified separated by a space. |
| Appendix | Optional field for additional parameters. |
The following fields are available when "Client Credentials" is selected as the grant type:
| Field | Description |
|---|---|
| Header Prefix | Prefix for the access token in the header, e.g. Bearer. |
| Token URL | URL of the OAuth server where the access token is requested by entering the username and password. |
| Refresh URL | URL for renewing the access token using the refresh token. |
| Client ID | The client ID of your application – provided by the API provider. |
| Client Secret | The client secret (password) used to authenticate your client. |
| Credentials Location | Specifies where the client ID and client secret are transmitted during the token request: in the body or in the header. |
| Scope | Specifies to which resources the API has permissions to access. Mostly used for large API providers. Multiple Scopes can be specified separated by a space. |
| Appendix | Optional field for additional parameters. |
The following fields are available when "JWT" is selected as the grant type:
| Field | Description |
|---|---|
| Header Prefix | Prefix for the access token in the header, e.g. Bearer. |
| Token URL | URL of the OAuth server where the access token is requested by entering the username and password. |
| Refresh URL | URL for renewing the access token using the refresh token. |
| Client ID | The client ID of your application – provided by the API provider. |
| Client Secret | The client secret (password) used to authenticate your client. |
| Credentials Location | Specifies where the client ID and client secret are transmitted during the token request: in the body or in the header. |
| Issuer | iss field in the JWT – designates the issuing entity (e.g. the client ID). |
| Subject | sub field in the JWT – identifies the user or entity for which the token is issued. |
| Audience | aud field in the JWT – specifies the recipient (e.g. token server) for which the JWT is intended. |
| Algorithm | Specifies which signature algorithm is used to sign the JWT. |
| Private Key | Key for signing the JWT. |
| Scope | Specifies to which resources the API has permissions to access. Mostly used for large API providers. Multiple Scopes can be specified separated by a space. |
| Appendix | Optional field for additional parameters. |
The following fields are available when "Password" is selected as the grant type:
| Field | Description |
|---|---|
| Header Prefix | Prefix for the access token in the header, e.g. Bearer. |
| Token URL | URL of the OAuth server where the access token is requested using the username and password. |
| Refresh URL | URL for renewing the access token using the refresh token. |
| Client ID | The client ID of your application – provided by the API provider. |
| Client Secret | The client secret (password) used to authenticate your client. |
| Credentials Location | Specifies where the client ID and client secret are transmitted during the token request: in the body or in the header. |
| Username | Username of the user for whom the access token is to be issued. |
| Password | Password of the user. |
| Scope | Specifies to which resources the API has permissions to access. Mostly used for large API providers. Multiple Scopes can be specified separated by a space. |
| Appendix | Optional field for additional parameters. |
The following fields are available when "Refresh Token" is selected as the grant type:
| Field | Description |
|---|---|
| Header Prefix | Prefix for the access token in the header, e.g. Bearer. |
| Token URL | URL of the OAuth server where the access token is requested by entering the username and password. |
| Refresh URL | URL for renewing the access token using the refresh token. |
| Client ID | The client ID of your application – provided by the API provider. |
| Client Secret | The client secret (password) used to authenticate your client. |
| Credentials Location | Specifies where the client ID and client secret are transmitted during the token request: in the body or in the header. |
| Refresh Token | The existing refresh token used to renew the access token. |
| Scope | Specifies to which resources the API has permissions to access. Mostly used for large API providers. Multiple scopes can be specified separated by a space. |
| Appendix | Optional field for additional parameters. |
At the provider level, you can also configure "IP ranges" and "error configurations". However, configuring these elements is optional.
3.1.5. IP Ranges
IP ranges serve as IP filters to increase security when integrating third-party systems into Salesforce via integraid. You can specify start and end IP addresses to define a specific range of IP addresses.
 X
X
If a server attempts to access the system using an IP address outside of the defined IP ranges, access is automatically denied. However, multiple IP ranges can be specified, and access is granted if the IP address is in at least one of these ranges. If no IP ranges are defined, access is allowed for all IP addresses by default.
3.1.6. Cookies
Cookies received during communication with a provider are automatically stored in the “Cookies” area. A cookie record contains the following fields:
| Field | Description |
|---|---|
| Name | Your own, freely selectable name for the cookie |
| Provider | Reference to the associated provider |
| Domain | Defines which server can receive the cookie. This includes all subdomains of the domain specified here. |
| Path | Defines the URL path that must be given for the cookie to be sent. |
| Expiration | Defines the expiration time of the cookie. |
| Secure | If this box is checked, the cookie is only sent for secure requests (HTTPS protocol). |
| Value | The actual value of the cookie is stored here. |
Cookies do not need to be configured manually, but are stored automatically if they are defined in an api response. Once a cookie is stored in Integraid, it is appended to all callouts with the associated URL and path. When the cookie expires, it is automatically deleted.
Note on advanced cookie management: Integraid's implementation of cookies is based on the following guide: https://developer.mozilla.org/en-US/docs/Web/HTTP/Guides/Cookies. The parameters “HttpOnly” and “SameSite” are not stored as they do not influence communication in Integraid.
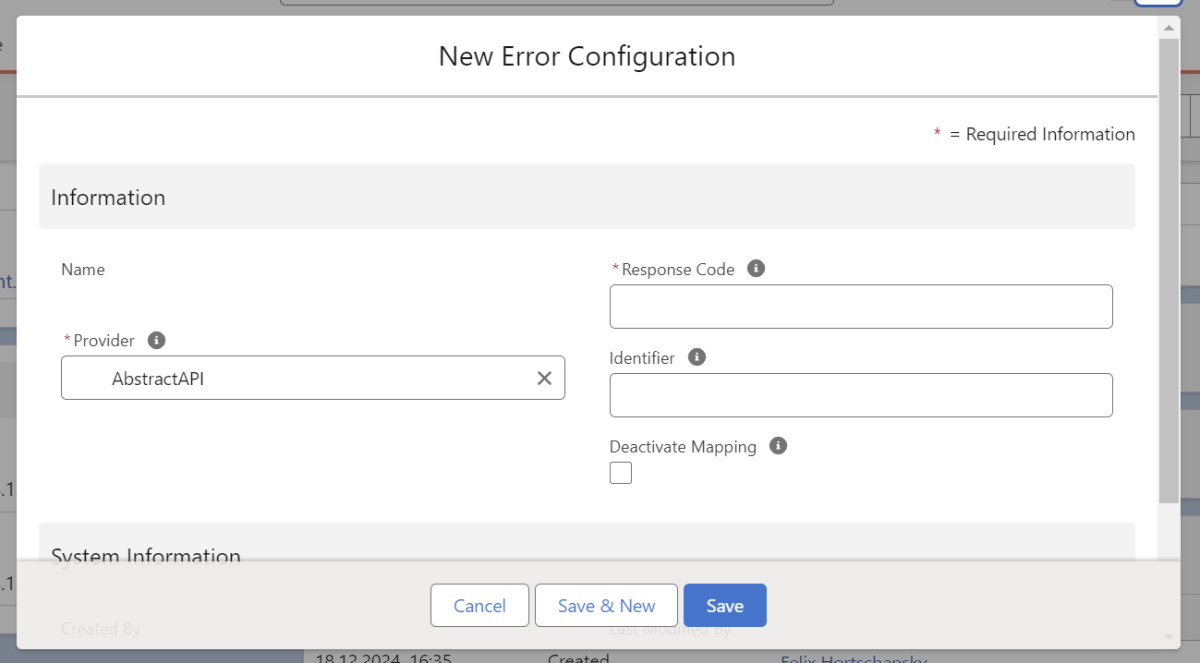
3.1.7. Error Configurations
Error configurations are used for error handling and define which HTTP response codes should be considered errors.
 X
X
In the "Response Code" field, you can either define specific response codes or general code ranges, such as all codes beginning with "4". 400 response codes can, for example, be interpreted as errors or as permissible responses, while 500 codes are always treated as errors.
Note: If you receive an error message saying "Access denied" or something similar with a 500 error, this may be due to the URL. Make sure that "https://" or "http://" is included in the URL. The protocol (http:// or https://) may also need to be added to the provider or to the endpoint if the provider's base URL is empty.
The "Identifier" field can also be used to define the identifier of the node in the response that contains the error message, e.g. "Message" or "Error". This identifier is used to clearly report errors in the results and to the user.
In addition, the "Deactivate Mapping" checkbox can be used to specify whether the error defined in the configuration should cause the mapping to be deactivated if it occurs again.
3.2. Endpoints
After creating the provider, one or more endpoints can be created. The endpoint is the API service that is to be addressed. You can add an endpoint by clicking on the "New" button at the top of the "Endpoints" tab.
An interface for creating an endpoint record opens. Fill in the following fields for the configuration:
| Field | Mandatory | Description |
|---|---|---|
| Name | Mandatory | Your own, freely selectable name for the endpoint. |
| Provider | Optional | Name of the provider to which the endpoint belongs. |
| Type | Mandatory | Indexes the type* of the endpoint. |
| Method | Mandatory | Specifies the HTTP method* used to address the endpoint. |
| URL | Mandatory | Contains the endpoint URL. This can be a complete URL or just the endpoint. If no complete URL is specified, the provider's base URL is prefixed. Merge fields* can also be used here. |
3.2.1. Types of Endpoints
First, the type of endpoint must be specified. The types determine how communication between Salesforce and third-party systems takes place. They define whether a request is synchronous or asynchronous and how the response is handled. There are four different types:
- Callout: A callout is a synchronous process in which integraid sends a request to a third-party system and receives an immediate response. The transaction is considered complete upon receipt of the response.
- Async callout: An async callout enables asynchronous communication in which a request is sent and a callback URL is specified for the subsequent transmission of the response. The response is sent at a later, unspecified time.
- Callin: Callin enables a third-party system to notify integraid of certain events, similar to a webhook. Notifications can be sent multiple times and at different times without a prior request. HTML forms can also send data to endpoints of this type.
- Forced Async Callout: The forced async callout executes a callout that is synchronous with the interface asynchronously on the Salesforce side. This bypasses Salesforce limits and thus enables longer callouts in Salesforce. We recommend using this type only when Salesforce errors occur due to Salesforce limits being reached.
3.2.2. HTTP Methods
HTTP methods are used to send requests to a server. Each method has a specific function that describes what kind of operation should be performed on a resource. Here is an overview:
- The GET method is used to query data from the interface without changing it. This method always returns the same results for repeated requests as long as the data on the interface side remains unchanged.
- The POST method is used to create new records in Salesforce or to execute actions such as triggers. Repeated requests can result in multiple records being created or processes being executed multiple times.
- The PUT method is used to create or completely update records in Salesforce. With each request, the record in Salesforce is replaced by the transmitted data, ensuring that the result remains consistent.
- The PATCH method is used to update existing records in Salesforce in a targeted manner. Only the specified fields are changed, making this method particularly efficient for incremental updates.
- The DELETE method allows you to delete records in Salesforce. Resending the request has no additional effect, as the record is already removed after the first request.
You can find out which HTTP method is required for your application in the provider's interface documentation.
Then you need to configure the endpoint by clicking on the "Configure" button. Here you configure the structure of outgoing and incoming data (outbound, inbound).
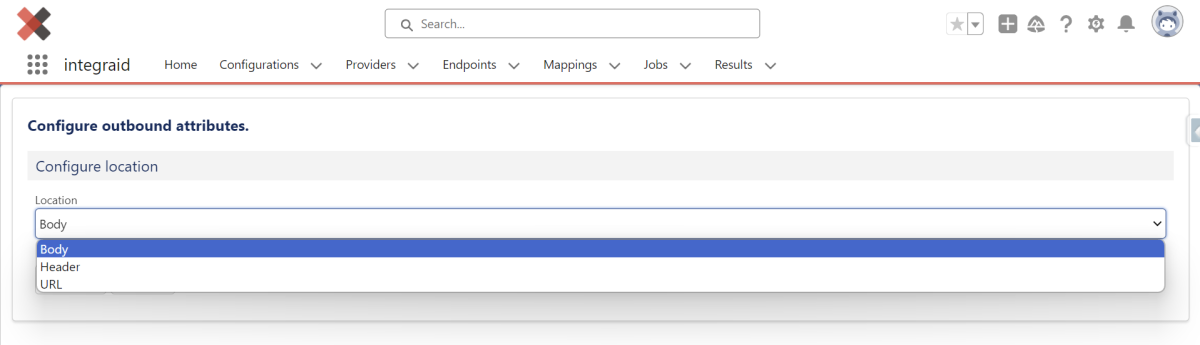
3.2.3. Outbound
First, you determine where the information you want to transfer from your Salesforce system to the interface is located. You have the options "Body", "Header" and "URL". These are the locations where the data can be transferred.
 X
X
Body
If you select "Body" as the attribute, the data to be sent will be transferred in the message body of the HTTP request.
- Content Type: You can specify the format of the message, e.g. application/json, application/xml or other formats, depending on the requirements of the interface.
- Quantity: This determines whether a single data element (single) or multiple elements (array) are to be transferred.
- Type: A distinction is made between node and value:
- Node: A structure with sub-elements.
- Value: A single value.
Below the body, you can create individual fields or nested structures that are populated with Salesforce data.
Using the "Import" function, you can also upload a sample structure (e.g. JSON), which will automatically create the fields.
Typical use cases for Body are:
- Sending records to REST APIs (e.g. POST new leads or opportunities).
- Transferring complex JSON objects.
Note: For transferring documents to an external API, integraid only allows Files (ContentDocuments) and does not support Attachments. If you encounter problems with transferring documents, check the type of the document, as this difference could trigger the error.
Header
If you select "Header", the Salesforce data is inserted into the HTTP header of the request.
- Quantity: Here, you also define whether individual values or arrays are sent.
- Type: Headers can also be divided into simple key-value pairs (value) or structured nodes.
Headers are used to:
- Send authentication information (e.g. API keys, bearer tokens).
- Transmit special control information to the API (e.g. content type headers).
As with Body, you can also add child elements (fields) here to build dynamic header fields.
URL
If you select "URL", data is appended to the API URL as parameters (query parameters).
- Quantity: Single values (single) or lists (array) are possible.
- Type: Defines whether the parameter is treated as a node or value.
With URL parameters, you can:
- Define static values.
- Dynamically transfer fields from Salesforce to the URL (e.g. domain, ID, status).
- Build arrays as comma-separated parameters.
The URL parameters are automatically formatted correctly (?key1=value1&key2=value2) and appended to the endpoint URL.
Typical use cases for URL parameters are:
- GET requests with filter or search criteria.
- Identification of a resource via the URL.
3.2.4. Inbound
Next, you specify what information you will receive from the interface. The inbound configuration deals with the structure in which the system receives data from an interface. Here you also have the options "Body", "Header" and "URL".
 X
X
Body
If you select "Body", integraid processes the content from the message body of the API response.
- Content Type: You specify the expected format, e.g. application/json, application/xml, etc. This tells integraid how to read the response structure.
- Type: This determines whether the data is interpreted as a node (complex structure) or value (single value).
You can create any number of attributes (data fields) in the body:
- Each attribute is assigned an identifier (name from the API).
- You specify the data type, e.g. string, number, boolean or date.
- You can define the structure yourself or generate it automatically from a sample response using the import function.
Typical use:
- Transferring complex JSON or XML responses with nested elements.
- Extracting multiple data fields (e.g. company name, turnover, location).
Header
If you select "Header", integraid reads the information directly from the HTTP headers of the response.
- Type: Here, too, you can use Node or Value, depending on whether simple or structured data is being processed.
In the configuration, you specify:
- Which header fields are to be evaluated.
- The types of header data (e.g. string, Boolean).
Typical use:
- Processing authentication data or system information transported in the header.
- Reading status information (e.g. tokens, session IDs).
URL
If "URL" is selected, integraid processes parameters or information contained in the URL of the response.
- Type: URL parameters can also be structured as simple values (Value) or complex structures (Node).
Here you define:
- Which URL parameters are to be evaluated (e.g. ID, status).
- How the data is read and further processed.
Typical use:
- APIs that return statuses or IDs via the URL.
- Retrieving results via redirects or query strings.
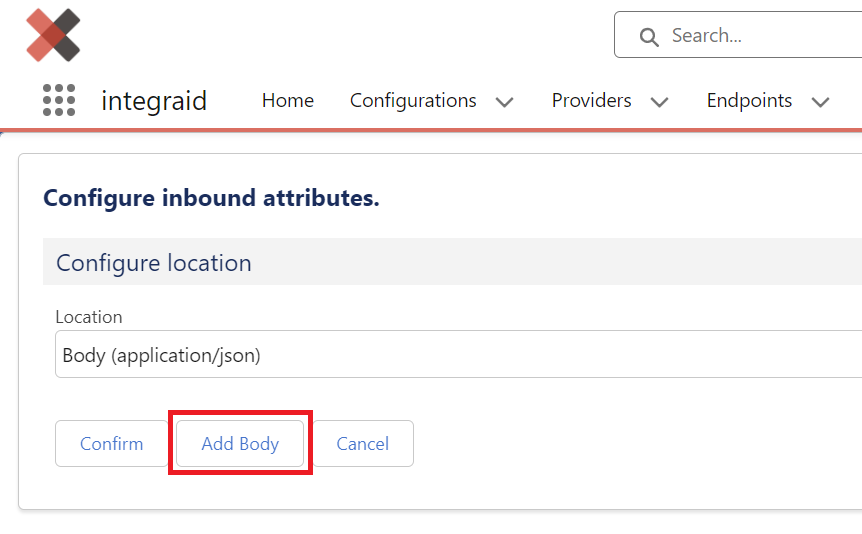
"Add Body" button
The "Add Body" button allows you to define alternative response bodies. This is particularly important if interfaces return different content types in case of success and failure. For example, a file may be returned as binary data (octet stream) in case of success, while JSON data is delivered in case of failure.
 X
X
By clicking on "Add Body", you can select one of the remaining content types and define a custom response structure. integraid uses the content type provided by the interface to determine the correct direction for response processing.
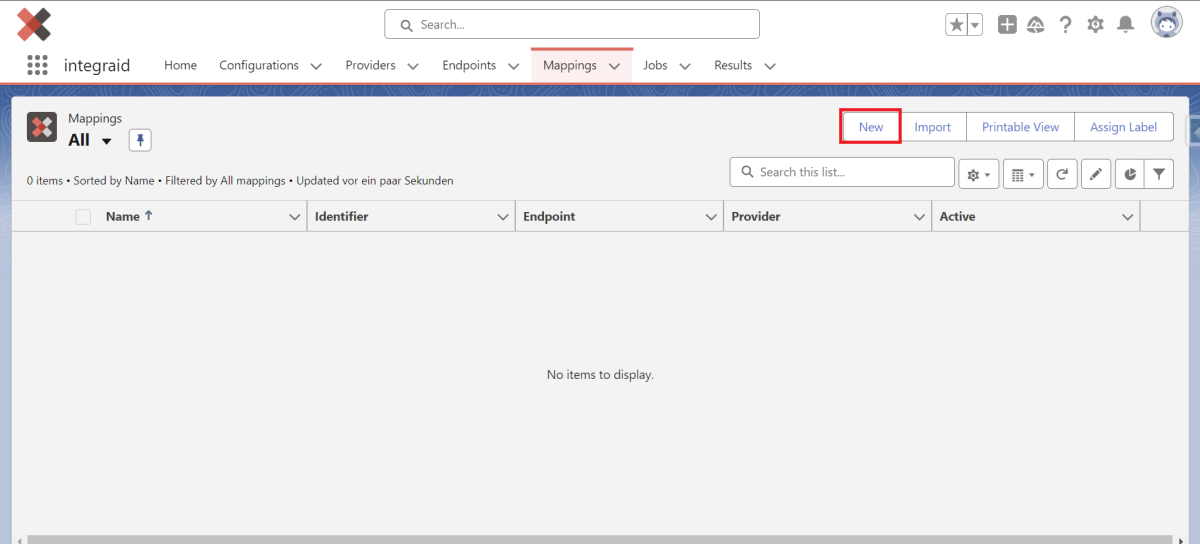
3.3. Mappings
After you have taught the system which information the endpoint receives from your Salesforce system and which information you want to receive from the endpoint, you now define where the information sent to the interface is taken from and where the data received from the interface is stored in your Salesforce architecture. You configure this with a so-called mapping. You can create a new mapping either within an endpoint or by clicking on "New" in the Mappings tab at the top right.
 X
X
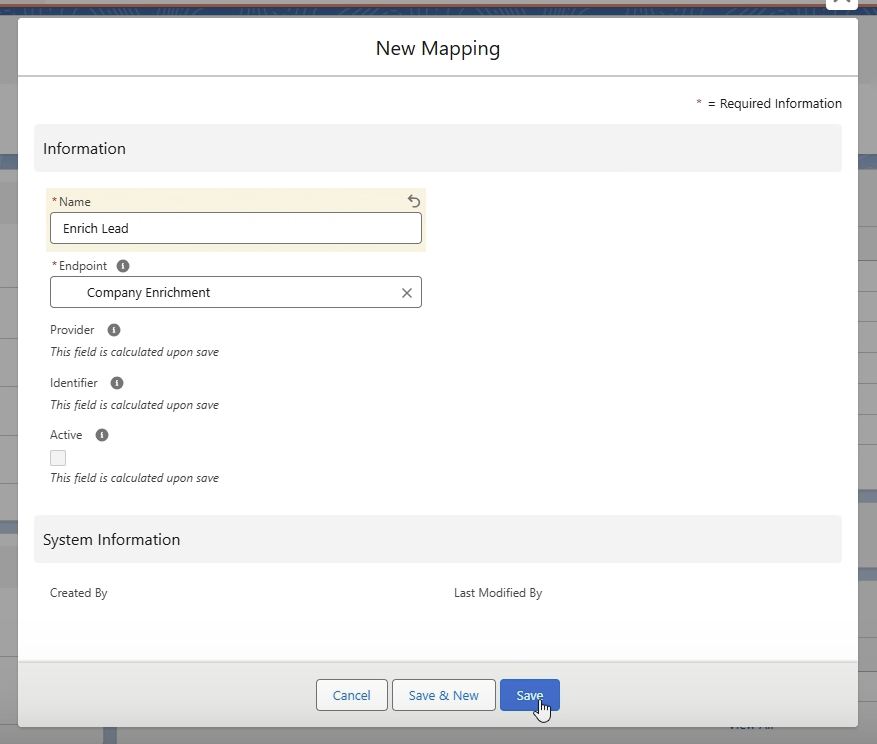
An interface for creating a "mapping" data set opens. Give the mapping a name and link it to an endpoint. Once you have saved the mapping, you can begin with the configuration.
3.3.1. Scopes
The basis of mapping is the data context, which is defined by so-called "scopes". Scopes are the data sources or ‘data truths’ used for mapping. They can have different levels, such as Field Scopes, List Scopes and Free Scopes, and allow access to the entire data structure in Salesforce.
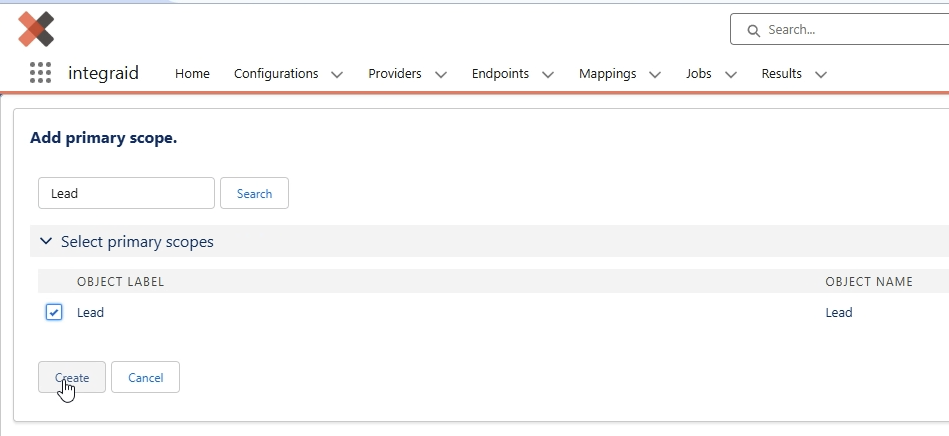
First, a primary scope is created. This is done using the "Add Scope" button at the top right of the mapping record. It defines under which object the information relevant to the endpoint is located.
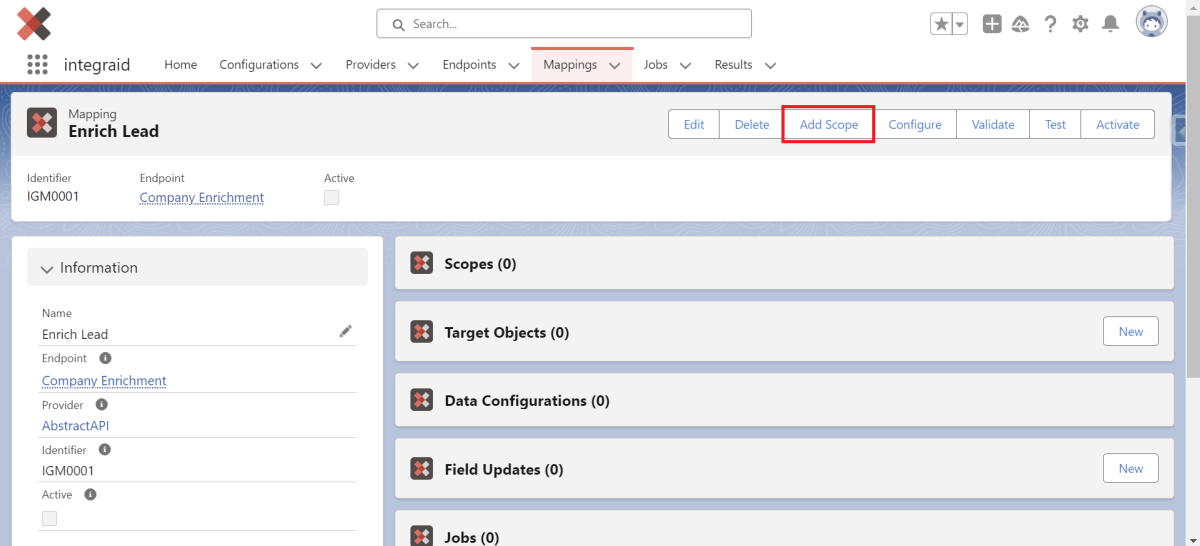 X
X
Here you select the desired object. If, for example, you need data from an account object for a callout, select the account as the primary scope. For example, we have defined the primary scope as Lead. The primary scope is visible in the Scope data record. Further scopes can now be defined from the primary scope. To do this, click on the Scope data record.
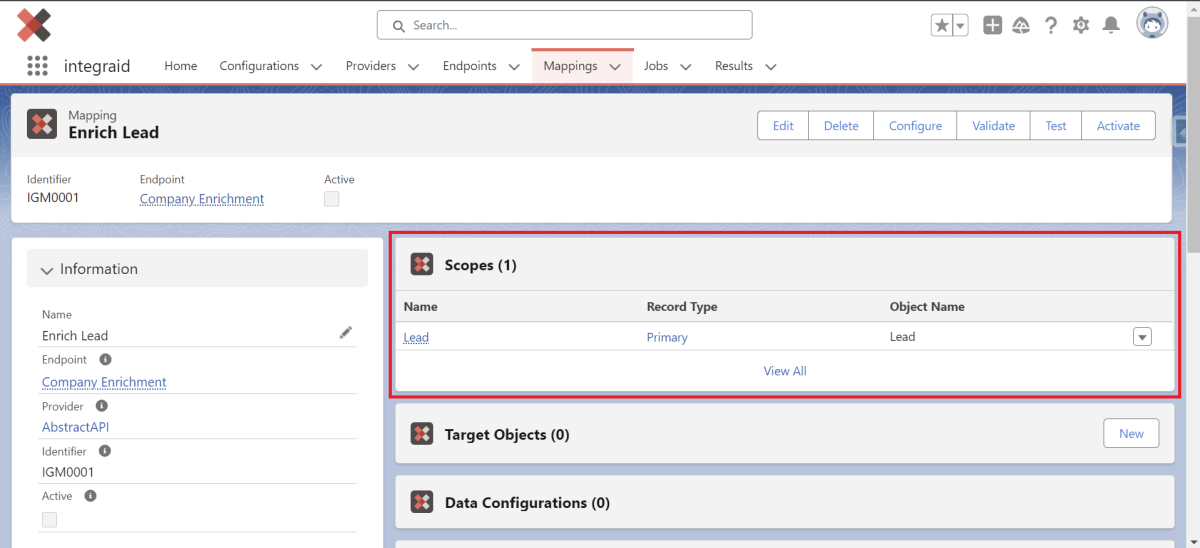 X
X
In addition to the primary scope, you can create so-called field scopes and list scopes within the primary scope by clicking on the "Create Child Scope" button. These are so-called "children" of the primary scope, i.e. they refer to data within the object of the primary scope. By clicking on the "New" button in the scope data record, you can also create a free scope.
 X
X
- Field scopes refer to lookup fields of the object and the data of the objects to which the lookup points (e.g. an account).
- List scopes refer to data from the object's lists (e.g. all contacts under the account defined in the field scope).
- Free scopes refer to all data records in Salesforce and do not need to be linked to a field or list scope (e.g. all products in Salesforce).
The principle of scopes can be confusing at first, which is why we will explain it again later using an example.
Record Rules
Often when you define List Scopes, you don't want to include every entry of the list, but only those you explicitly need for your API call. For this purpose you can define Record Rules. A Record Rule can apply one of three operations to your list scope:
- Filter: Lets you define a condition based on a field which must be satisfied for the entry to be included in the list scope.
- Order: Lets you define an ordering of the list based on a specified field. If you have more than one Order Record Rule, you can define priorities, which control in which way the Order Record Rules are applied.
- Limit: Lets you set a numerical limit for entries from the list to be included. A Limit Record Rule will always be applied after all other Record Rules for consistency.
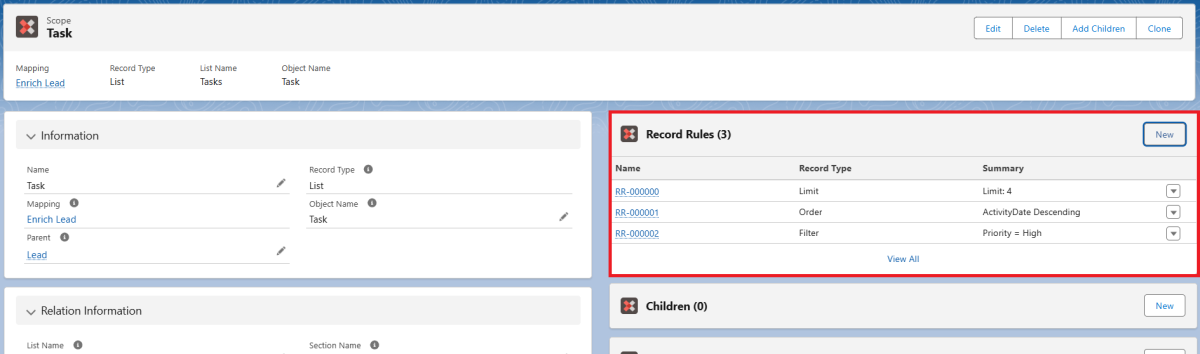 X
X
In this example, we added the List Scope "Task" of our Primary Scope "Lead". As we don't want to include all tasks, we have defined some record rules. The three rules we have defined will include the 4 most recent tasks, whose priority is set to 'High'.
Note: You can also define Record Rules for Free Scopes, as Free Scopes can be Lists, too.
3.3.2. Target Objects
In addition to the scopes, target objects can also be created. These are specially designed for inbound mappings and are used to perform specific actions on Salesforce objects. To create a new target object, click on the "New" button next to "Target Objects".
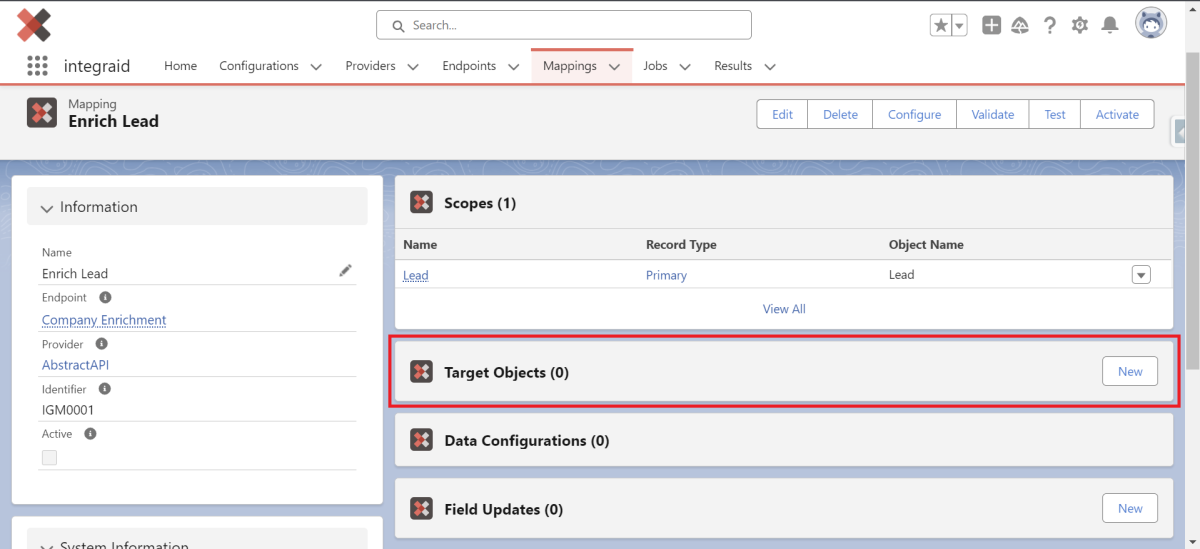 X
X
An interface for creating a "Target Object" data set opens. Give the Target Object a name, enter the object name and select an action.
 X
X
The following actions are available:
- Insert: New data records are created.
- Read: The data is only read; no changes are made to data records.
- Update: Existing data records are updated.
- Upsert: New data records are inserted or existing ones are updated if a matching data record already exists.
Note: In this area, only the definition of all target objects on which operations are to be performed takes place. As with the scopes, the operations are configured using the “Configure” button.
3.3.3. Outbound Mapping
Once you have created your scopes, you can start configuring the mapping. Outbound mapping allows you to specify where the information to be sent to the interface is taken from. You can start the configuration by clicking the "Configure" button within the mapping data set.
 X
X
Select "Outbound" as the direction.
 X
X
The data location specified in the outbound endpoint has already been selected.
 X
X
Now select the scope that contains the relevant information. Click on the "Add" button to add the attribute. Under "Source", you can now access all relevant fields that contain the outgoing information.
 X
X
For handling arrays, there is also the "Map Multiple Values" checkbox, where the values are separated by a character specified in the "Separator" field.
However, you also have the option of filling the attribute statically by leaving the "Scope" field blank. You can then enter your value in "Source".
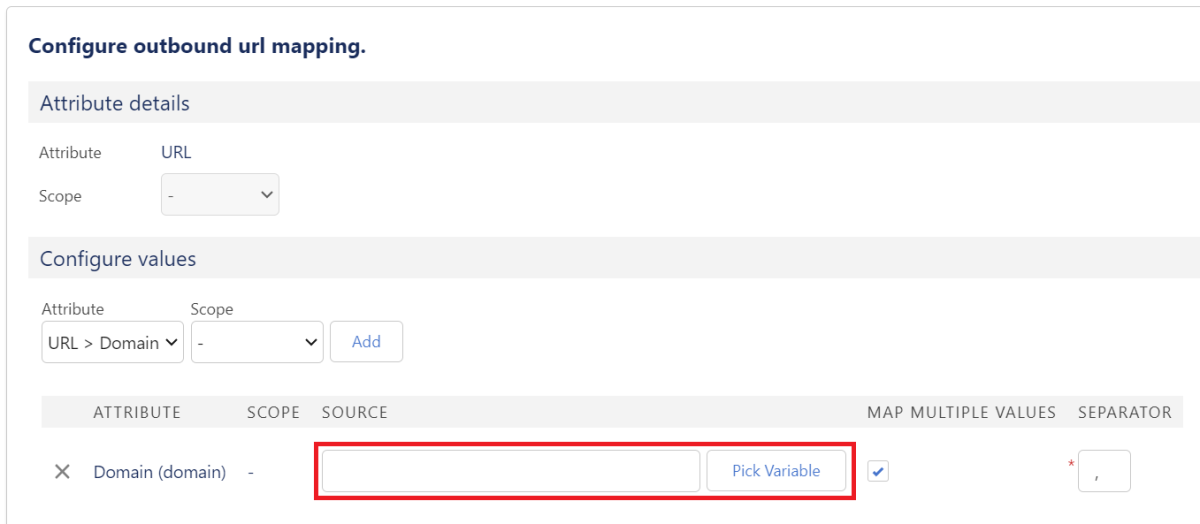 X
X
By clicking on the "Pick Variable" button, you also have the option of accessing certain variables that are frequently used dynamically.
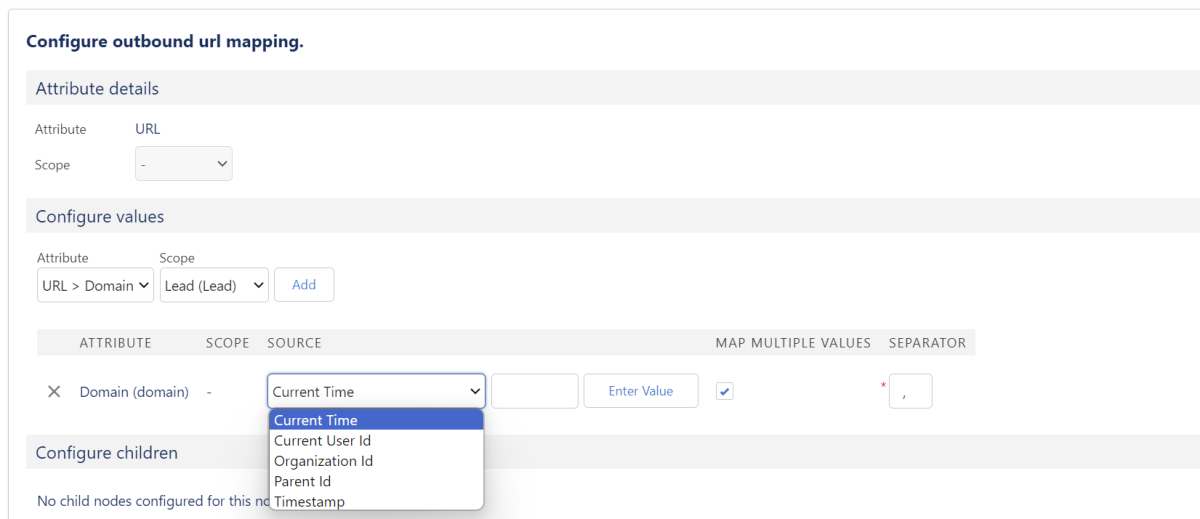 X
X
They can be used to generate dynamic values that can later be adjusted in the field next to them (e.g. timestamp minus one week). It is possible to enter a deviation in minutes to define dynamic date and time values.
3.3.4. Inbound Mapping
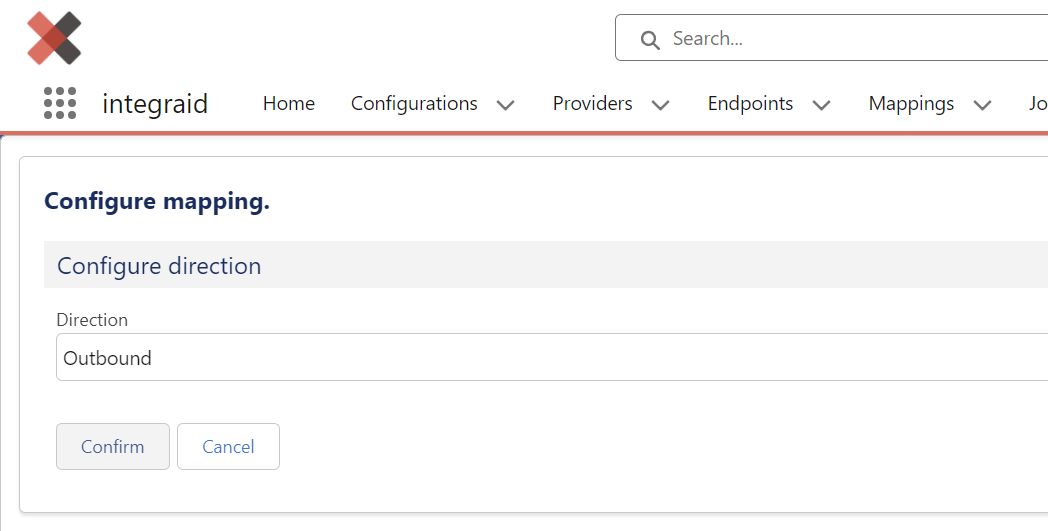
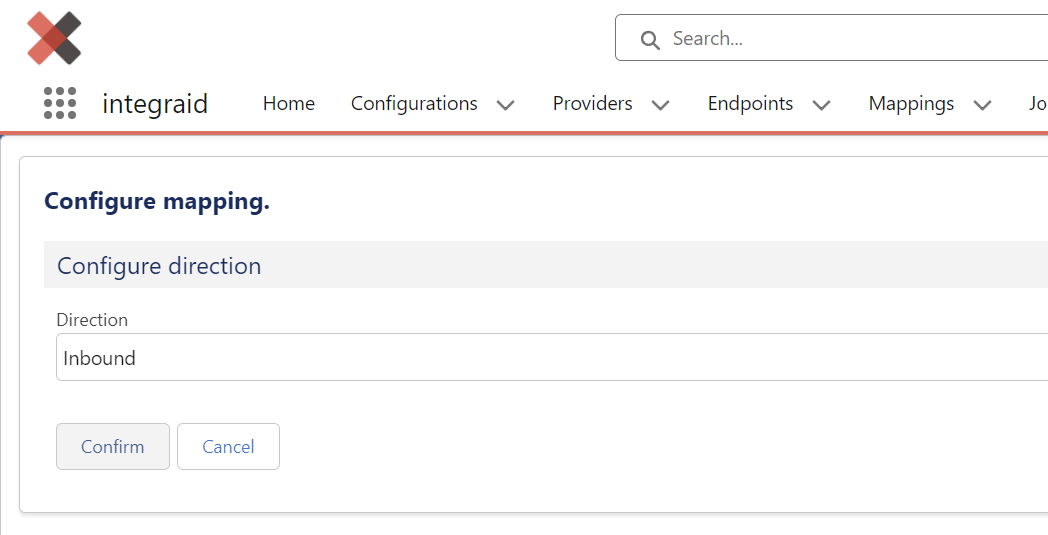
Inbound mapping allows you to specify where the data received from the interface should be stored in your Salesforce architecture. You also start the configuration via the "Configure" button within the mapping record, but this time select "Inbound" as the direction.
 X
X
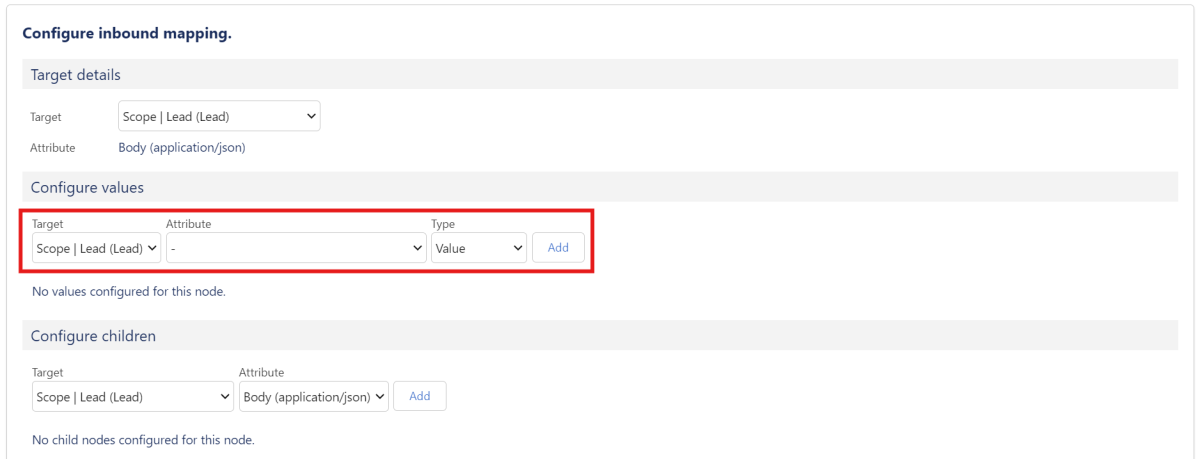
Here, under "Target", select the target object to which the values received from the interface are to be transferred. Under "Attributes", you have access to all attributes that have been defined in the endpoint.
 X
X
By clicking on the "Add" button, you can add the configuration and, in the next step, select the field in which the respective attribute is to be displayed under "Field".
 X
X
Here, too, the "Map multiple values" checkbox allows you to process arrays or comma-separated values. If an attribute contains multiple values, you can use the checkbox to control how these values are written to Salesforce (e.g. all values comma-separated in a text field or in a multiple selection list).
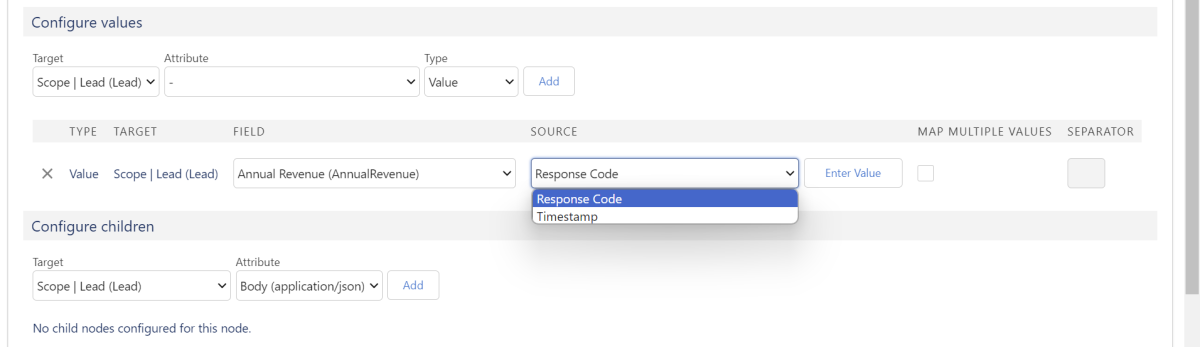
If no attribute is specified, you also have the option of specifying static values or accessing the "Response Code" and "Timestamp" variables.
 X
X
In the "Configure Children" section, you can create records related to a parent object. Set your previously created target object as the "Target" and click "Add".
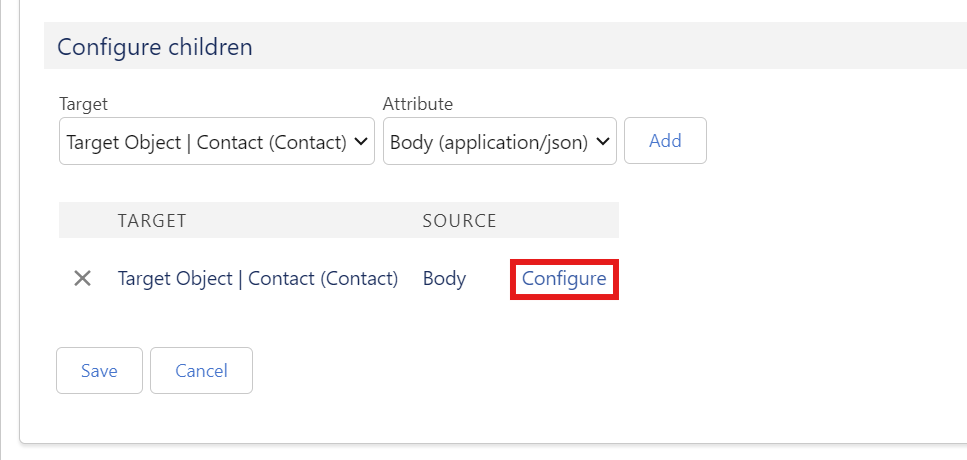 X
X
Now you can click on "Configure" and go one level deeper in the configuration. Here, the configuration works exactly as it does at the parent object level. For Values, you can choose an attribute to be assigned to a value in Salesforce, or define static input or choose a variable from a picklist by leaving the 'Attribute' field empty.
 X
X
For the time-based variables (Current Time, TimeStamp), you can additionally add a time offset in the empty field next to the variable field. This time offset is calculated in minutes, for example a '+60' entry in the empty field adds 60 minutes to the time-based variable, while a '-60' entry subtracts 60 minutes.
With the "Superordinate Id" variable, you have access to the ID field of all parent objects. This makes it possible to access objects that are several levels above your position. The numbering refers to your current position (#1=one position above you, #2=two positions above you).
The "Back to Parent Object" button takes you back to the higher level.
 X
X
Note: You can use both merge fields* and merge attributes* to reference data from the parent object or the interface response and write it to the fields of the child object. The system automatically validates whether the merge fields have been entered correctly.
3.3.5. Merge Attributes
Merge Attributes can be used in the same way as merge fields, except that they are used to reference values of incoming or outgoing data sent from or to the external interface instead of fields from your Salesforce Org. As merge attributes reference attributes, they can only be used in two locations:
1. Inbound Mapping of a Callout
2. Outbound Mapping of a Callin
To use a merge attribute, add a new value in 'Configure values' with your desired target object while leaving the 'Attribute' field empty. For 'Type', choose 'Value'. This will create a new value with an empty text field, which you can populate with plain text and, more importantly, merge attributes.
Syntax for merge attributes
Merge attributes are denoted with a '$' in front of the actual attribute. The complete syntax for a merge attribute is as follows:
{$Location.Node.Value}
where Location denotes the location of the incoming data that should be referenced (e.g. Header, Body), Node denotes the name of the node that the desired attribute lives in, and Value the exact value that should be fetched from the merge attribute.
If a value lives multiple nodes deep, you must reference the complete path to the node, with each node separated by a dot. For example, if you have a variable 'Street Name' which lives multiple nodes deep, with the structure Body > Company > Address > Street_Name, the correct reference for a merge attribute would be {$Body.Company.Address.Street_Name}.
Note: You can also access the predefined variables via merge fields. This is possible using {variableName}. You can also insert the offset for time-based variables by adding":+30", as well as the position of the Superordinate Id.
Examples: {responseCode}, {timestamp:+60}, {currentUserId}, {currentTime:-60}, {superordinateId:2}
Example:
In this example, we receive an answer from a callout to an API containing information about a company and its location details. We now want to input the country into the 'Country' field of our Lead object. However, we want to input additional plain text that reads "Country: ". To do this, we use merge attributes.
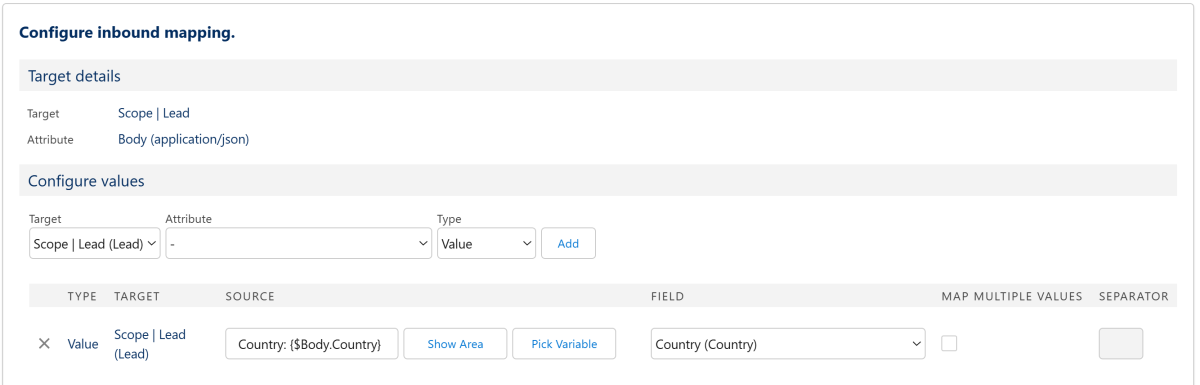 X
X
With this configuration, the input for the field "Country" of our Lead object for a company from Germany will now read: "Country: Germany".
Embedding of all elements of a List Scope
If a list scope is used via a normal merge field, only the first entry of this list scope is taken into account. If you want to embed all entries of the list scope, you must use a different syntax. This is as follows:
For Mergefields: {tableStart:Scope} …content... {tableEnd:Scope}
For Merge Attributes: {$tableStart:Location.Node...} ....content.... {$tableEnd:Location.Node....}
Here, ‘Scope’ acts as a placeholder for the API name of the List Scope. For merge attributes, the full path to the desired node location must be given after tableStart and tableEnd, as well as a leading '$' sign (indicating that this field is a merge attribute).
In the content area (i.e., between tableStart and tableEnd), content can be formulated that will be included for each entry of the List Scope/Node. Merge fields/attributes can be used here as well as HTML-formatted text. An example of how to use this syntax is:
{tableStart:Tasks} - {Task.Description} <br> {tableEnd:Tasks} for Mergefields OR
{$tableStart:Body.Node} - {$Body.Node.Description} <br> {$tableEnd:Body.Node} for Merge Attributes
This operation writes the descriptions of all tasks from our list scope ‘Tasks’ (or a set of nodes "Node") in a field. The abbreviation <br> is interpreted as a line break in HTML.
3.3.6. IF Statements
IF conditions can be used to display different values in a field configuration based on conditions. Here, a specific value (e.g., from a merge field/merge attribute) is checked and a result is displayed if the value meets a condition. If the condition is not met, a different value can be displayed. This allows you to store different values in your Salesforce system based on data from the interface response and from Salesforce.
The syntax for IF conditions is:
IF( field name/merge attribute == “value”, “value if condition is true”, “value if condition is NOT true” )
First, the condition is defined, followed by the value separated by commas if the condition is met and the value if the condition is not met. For advanced conditions, the values themselves can contain IF conditions.
The following operators can be used for the condition:
- == (true if the values are equal)
- != (true if the values are not equal)
- <, > (true if the value is actually smaller/larger)
- <=, >= (true if the value is less than or equal to/greater than or equal to)
These operators can be used to compare numerical values as well as dates and times.
The following operators are also available for textual comparisons:
- contains (true if the value contains this string)
- not contains (true if the value doesn't contain this string)
Note: Fields of type "Currency" can not be compared as numeric values. If you still want to use the value of a currency field in a comparison, create a formula field of type “Number” that stores the value of the currency field.
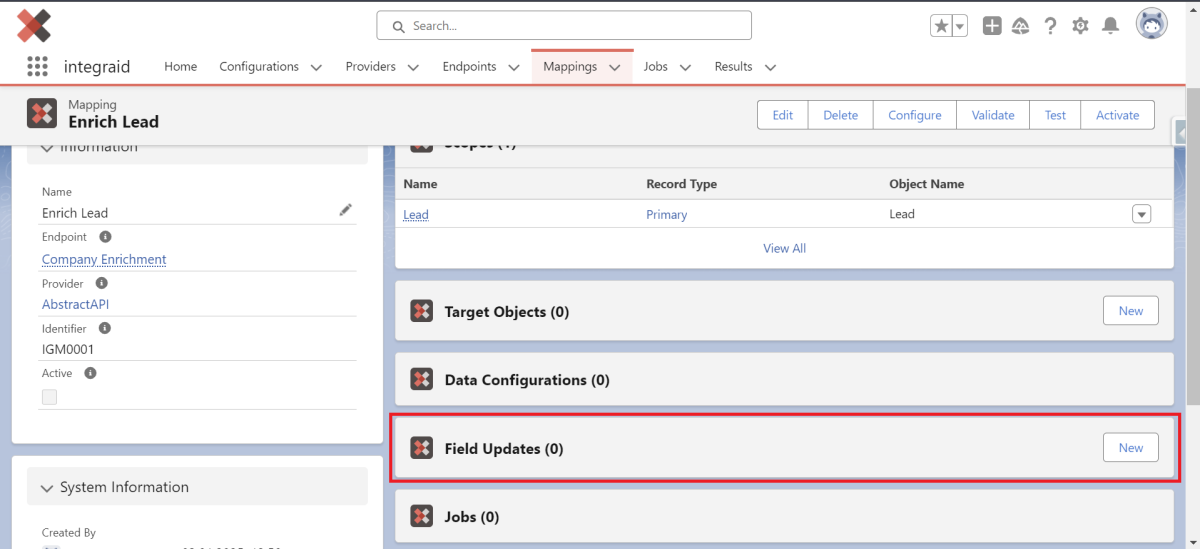
3.3.7. Field Updates
Field updates are a feature in integraid that allows you to update fields in Salesforce after a callout or callin has taken place. Unlike data configurations, which are updated depending on the response from the interface, field updates are always executed regardless of whether the interface was successful, returned an error, or did not respond at all. You can create a new Field Update by clicking the "New" button next to Field Updates within your mapping record.
 X
X
A screen for creating a "Field Update" data record opens.
 X
X
Here you can give the record a name, specify the scope and enter the name of the field to be updated in "Field Name". In "Operator" you can specify the comparison operator to be matched, in "Condition Value" the current value of the target field and in "New Value" the target value for the updated field. The value in "New Value" is only written here if the condition specified in "Operator" is met (e.g., only write to a field if it is empty). In addition, under "Event", you select the events that should trigger the field update.
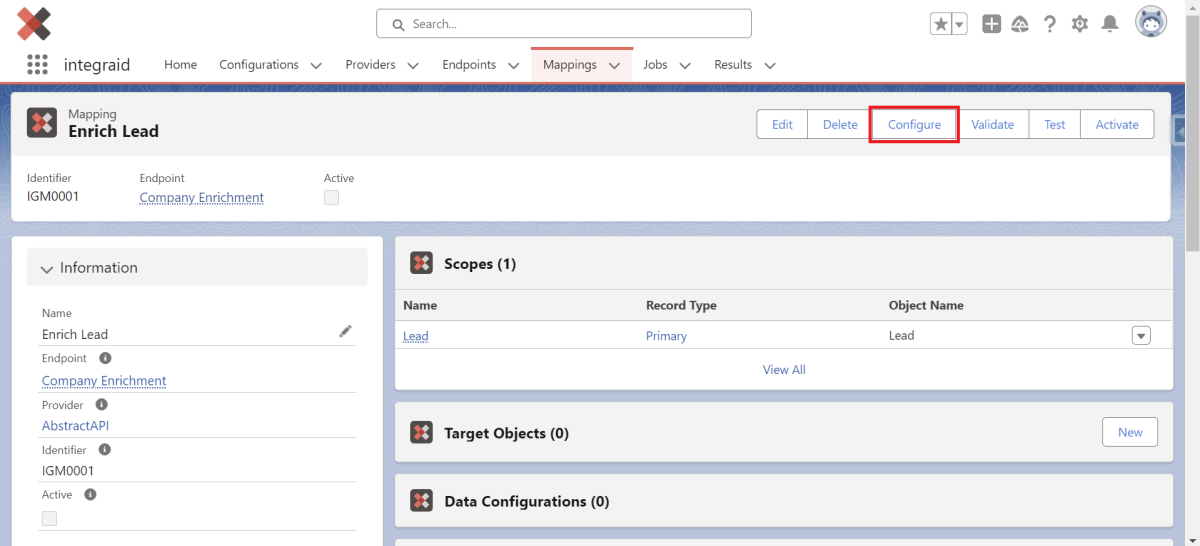
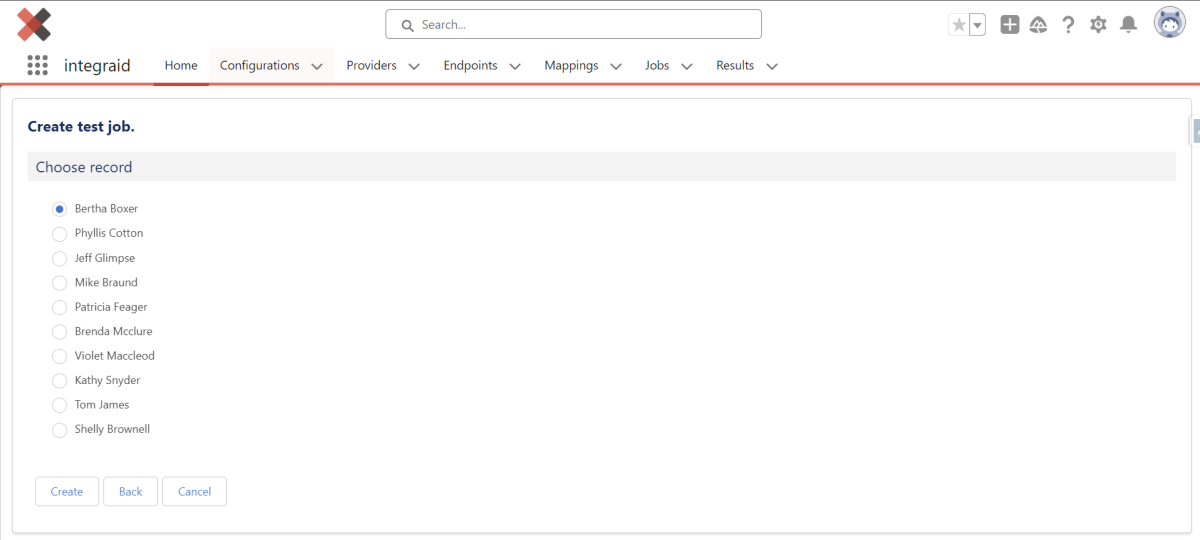
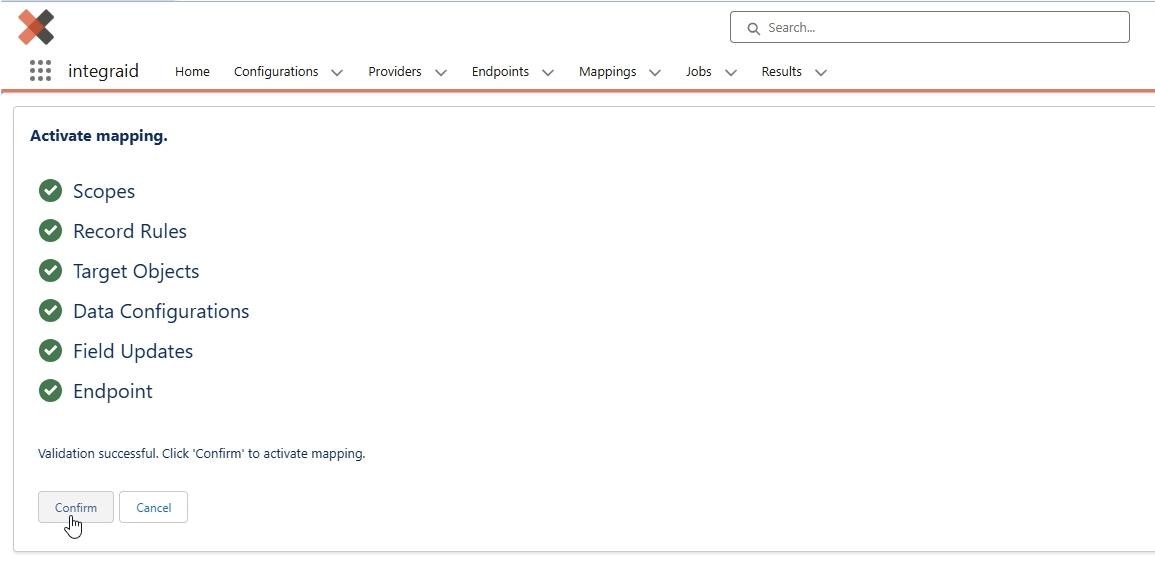
Once the mapping has been configured, you can validate it by clicking on the "Validate" button and activate it by clicking on the "Activate" button. To test it, you can click on the "Test" button.
 X
X
Here you can select a record within your scopes and click "Create" to create a job.
 X
X
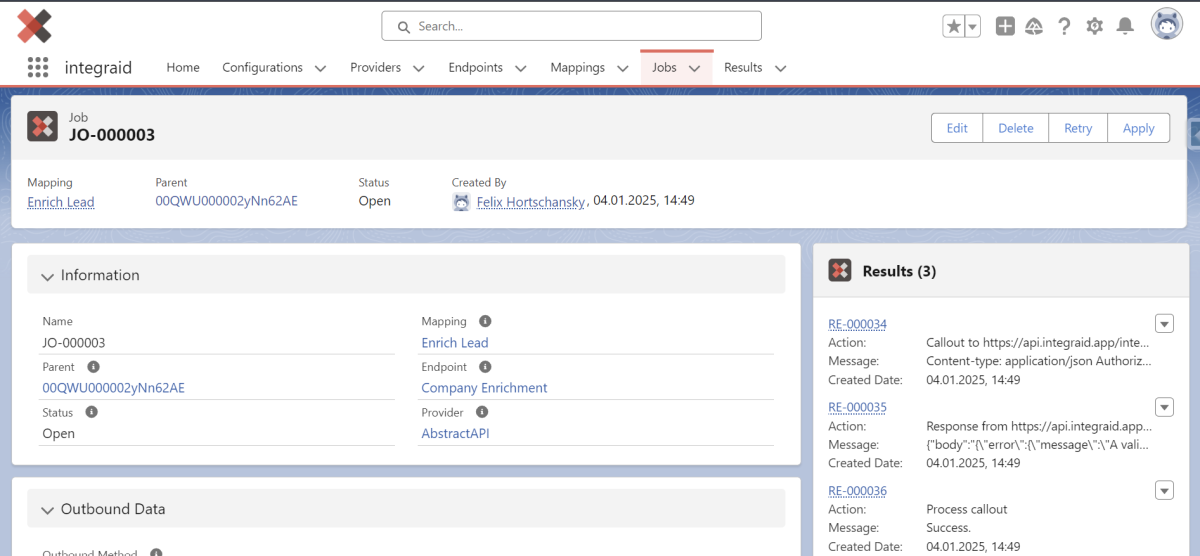
3.3.8. Jobs
Jobs are a central component in integraid that handle every callout and every callin. They serve as a kind of log or record for every interaction with an interface and enable asynchronous processing of data. You can find all your jobs in the tab of the same name on the integraid interface.
 X
X
- When a test job is created from a mapping, the callout is executed, but no data is written to the database. This prevents live data from being affected by test runs.
- If an error occurs during data application, the underlying error can be corrected and the data application can be repeated using the "Retry" button in the job.
- The "Apply" button is used to manually trigger the application of a job. This means that the results of a callout are written to the database. There is then an ‘Evaluate’ option that allows you to view the effect of the application before it is executed.
 X
X
Each job also has a status that indicates whether the job is still open or has been successfully completed. If an error occurs, the job remains open, allowing you to respond to open jobs and rerun them if necessary.
3.4. Example Abstract API
In this section, we will show you how integraid works using the example of the Company Enrichment API. Here, we want to obtain information about a company from the website provided by a lead and automatically extract it into our Salesforce system. We take the information from the interface documentation: https://docs.abstractapi.com/company-enrichment
3.4.1. Preparation in Salesforce
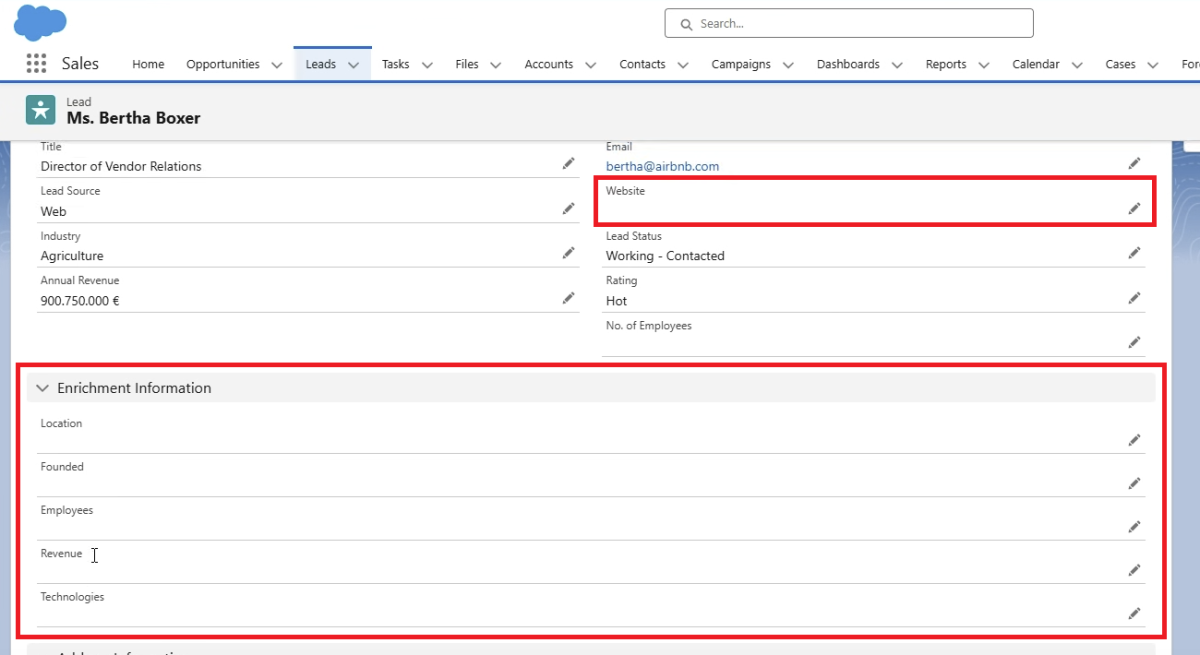
- Create fields: In the standard Salesforce lead object, we first create five fields to store the data returned by Abstract API. These fields are:
- Location
- Founded (year of foundation)
- Employees (number of employees)
- Revenue (annual turnover)
- Technologies (list of technologies used)
- Create formula field: We also create a formula field that extracts the domain from the website field. Abstract API requires the domain as an identifier for the company.
 X
X
3.4.2. Configuration in integraid
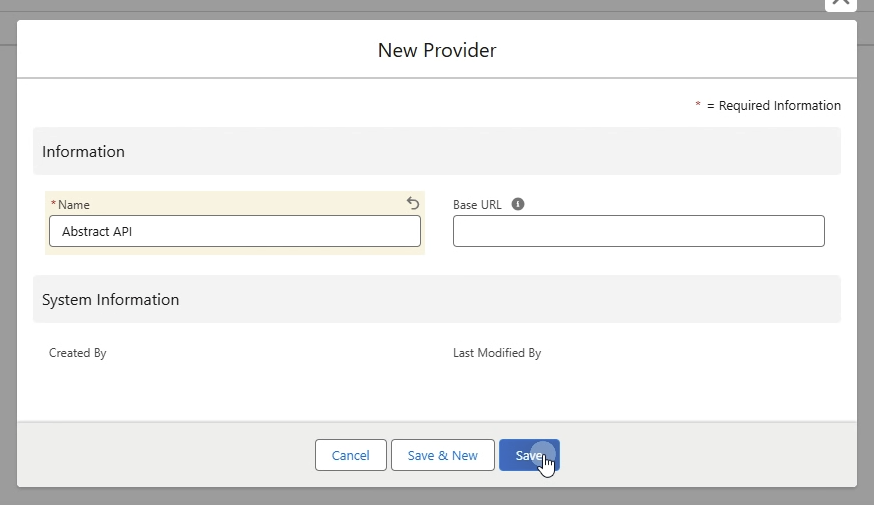
- Create provider:
- First, we create a new provider record in integraid that defines the interface provider. In this case, we call it "Abstract API". We leave the base URL blank.
 X
X
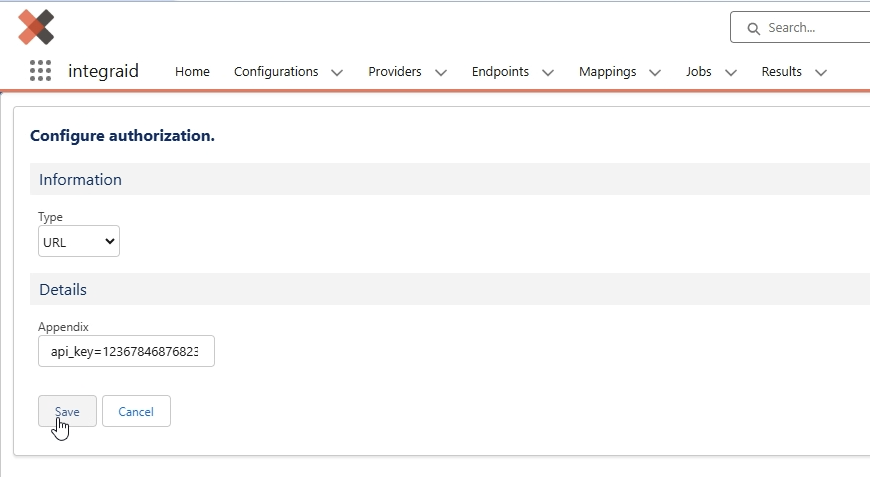
- Configure authorisation: The second step is to configure authorisation. Set the authorisation type to "URL" and pass the API key from Abstract API as a URL parameter with the name "api_key".
 X
X
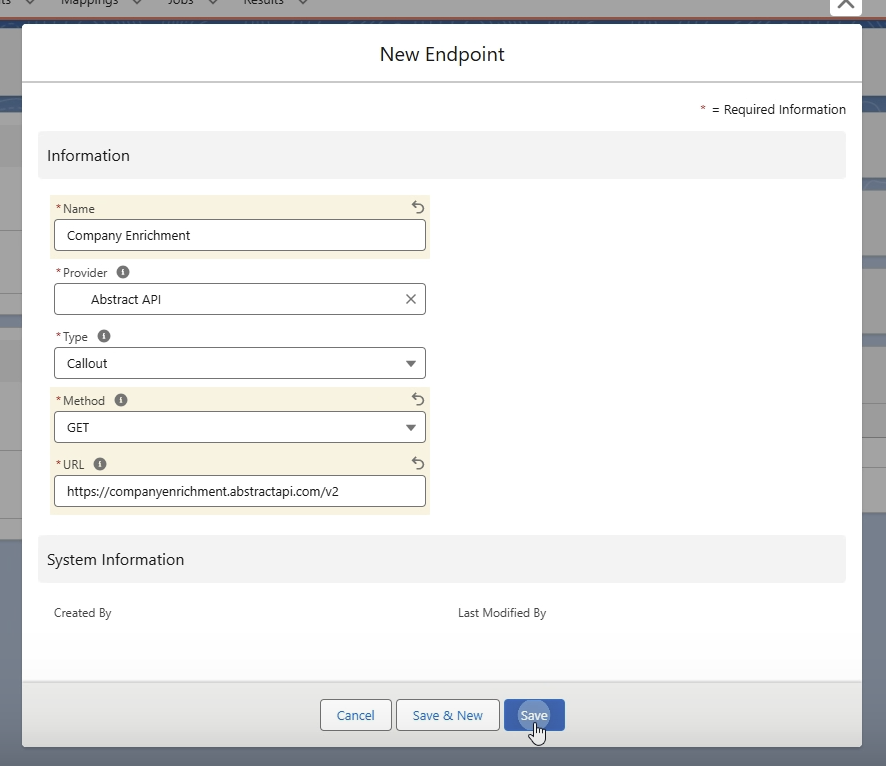
- Define endpoint: The third step is to configure the endpoint. This includes the type of data the interface expects and the structure of the returned data. We create an endpoint with the following information:
- Name: Company Enrichment
- Provider: Abstract API
- Type: Callout
- Method: GET
- URL: https://companyenrichment.abstractapi.com/v2
We copied the HTTP method (GET) and the URL of the Abstract API from the interface documentation.
 X
X
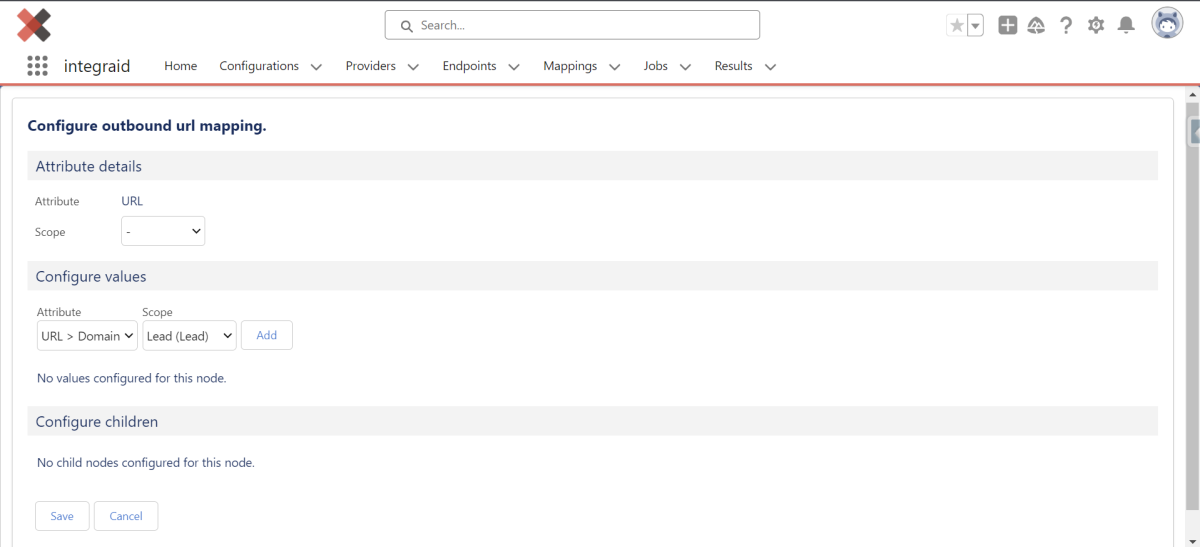
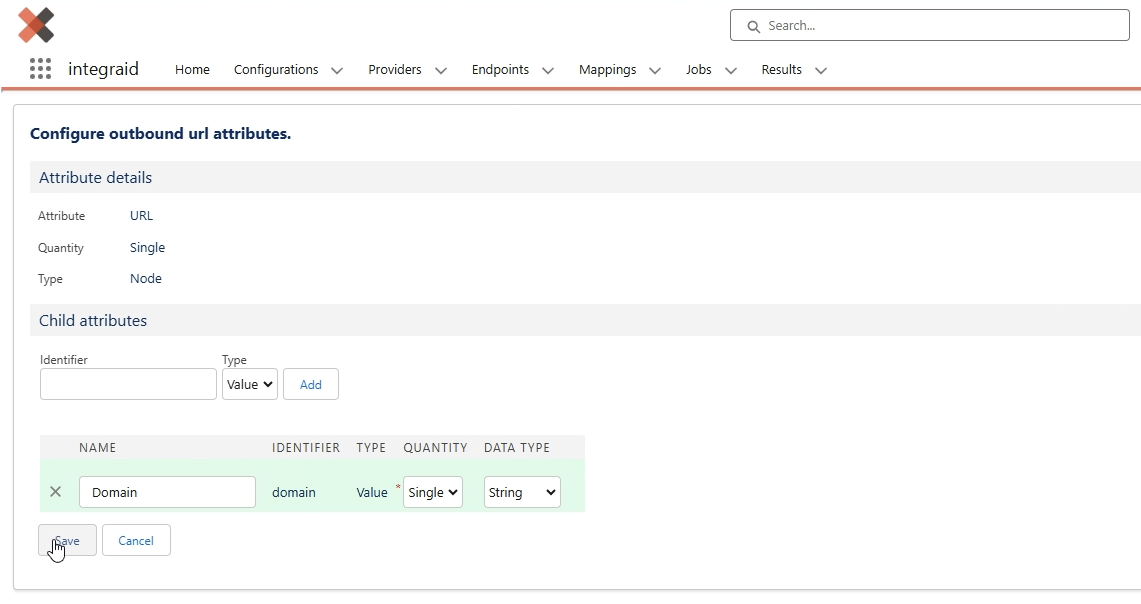
Configure outbound: In the interface documentation, we can see that the interface expects a URL parameter called "Domain".
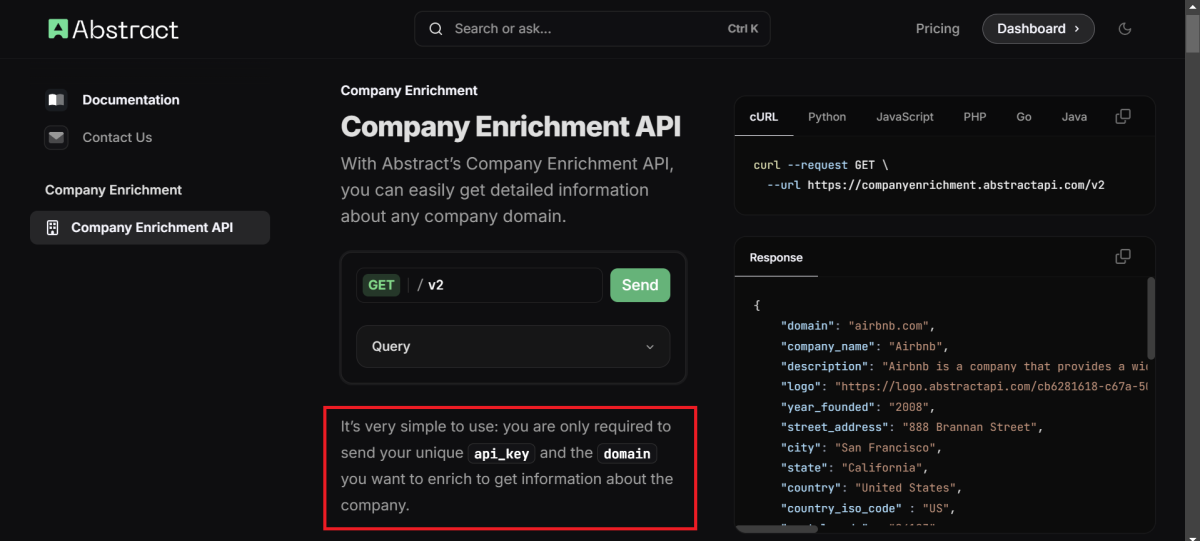 X
X
So we click on the "Configure" button within the endpoint, select "Outbound" and then "URL". We enter "domain" in the Identifier field and select "Value" as the Type.
 X
X
Configure inbound: Here, the structure of the response from Abstract API is defined. In the interface documentation, we see a sample response in JSON format, which we can copy and import into integraid.
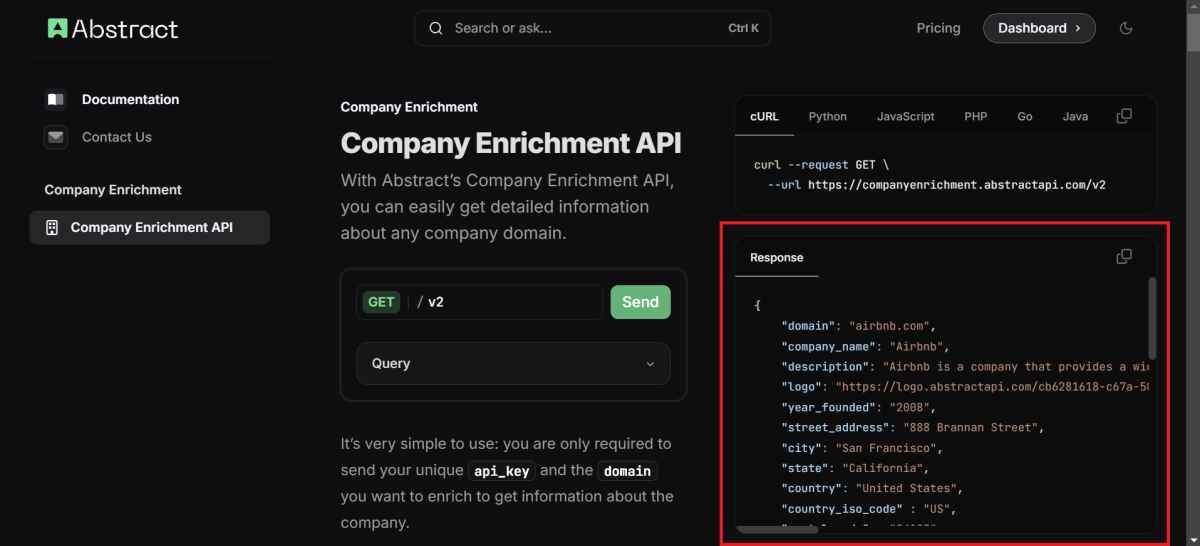 X
X
We click on the "Configure" button within the endpoint again, select "Inbound" and then "Body". We set the content type to "Application JSON" and select "Node" for the type. Now click on "Import" and then copy our sample response into the "Input" field. Clicking on the ‘Import’ button automatically creates the attribute structure.
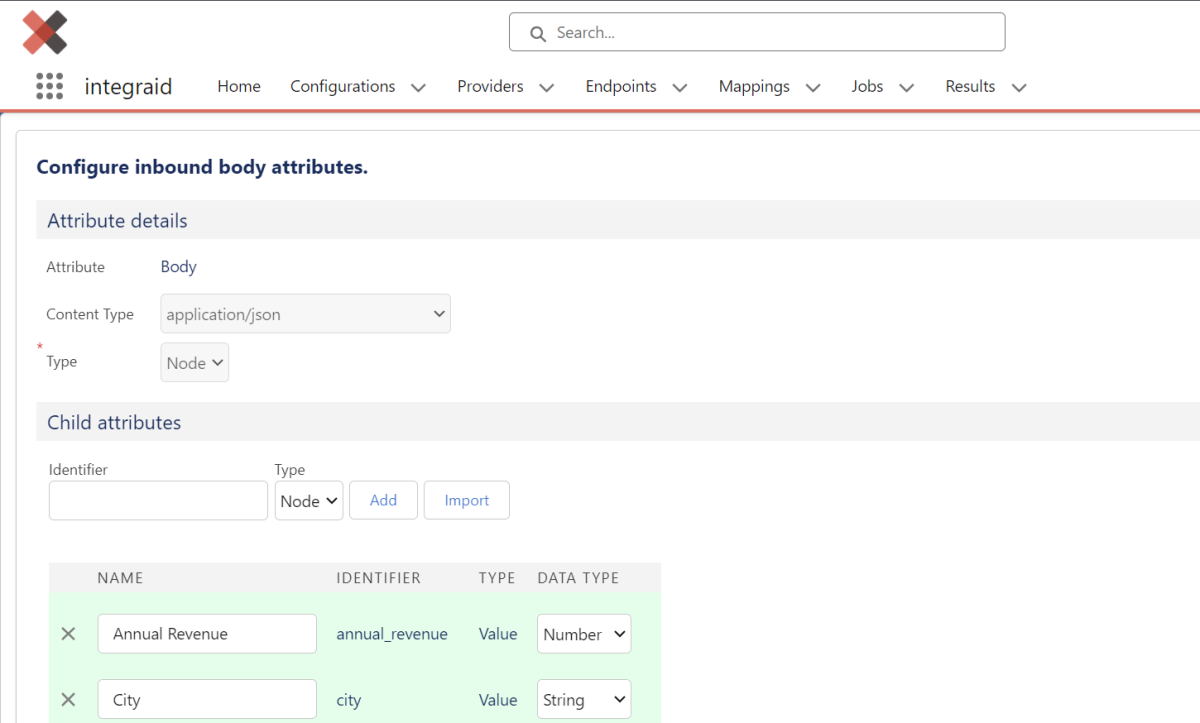 X
X
Finally, click on the "Save" button, the attributes are saved and the endpoint is configured.
- Configure mapping: The fourth step is to configure the mapping. We create a new mapping that establishes the connection between the structure in the endpoint and the Salesforce data. We name the mapping and link it to the "Company Enrichment" endpoint.
 X
X
First, we define the scope by clicking on "Add Scope". Here, we select Lead as our primary scope.
 X
X
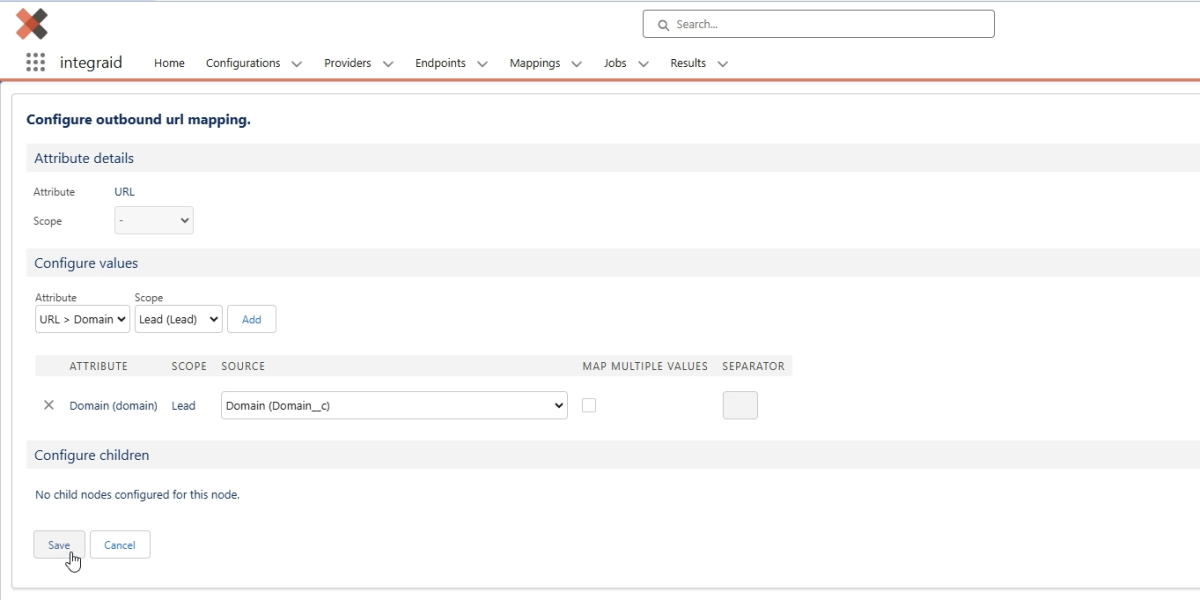
Configure outbound: The "Domain" attribute is assigned to the formula field that extracts the domain from the website field. To do this, click on "Add" and then select the previously created formula field "Domain__c" under Source.
 X
X
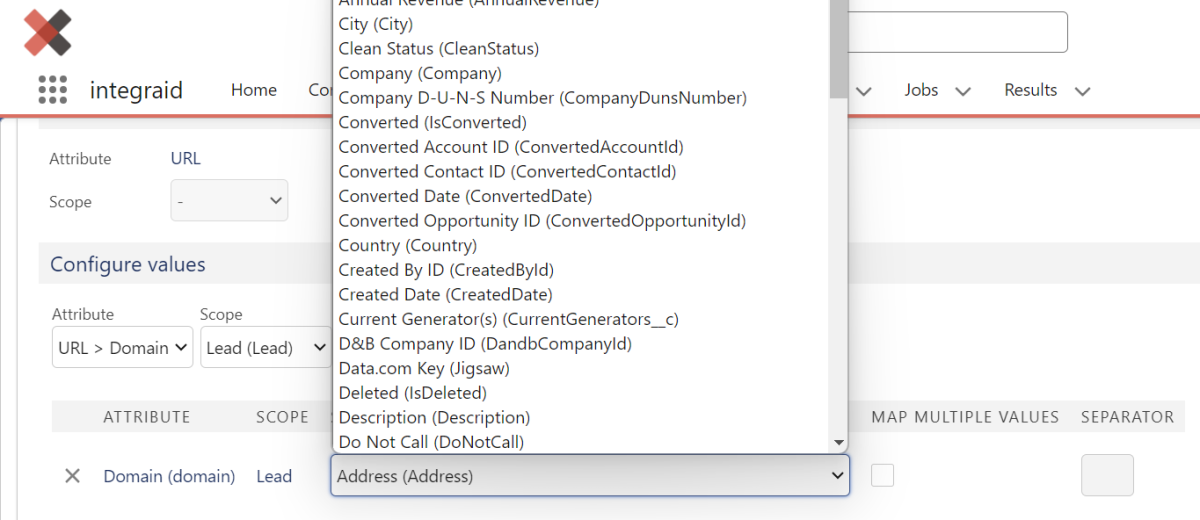
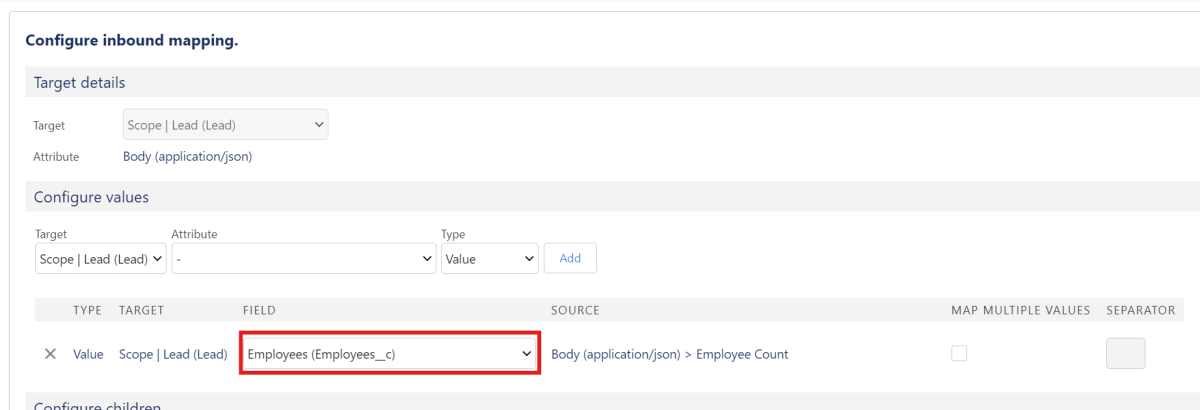
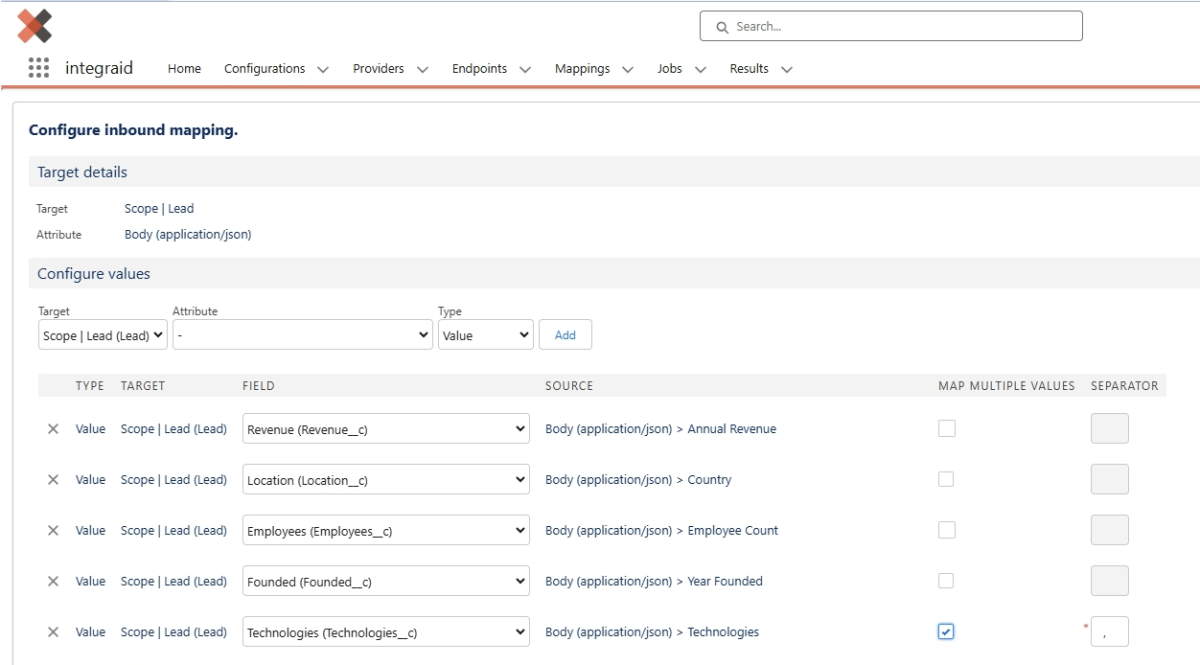
Configure inbound: Here, the fields in the lead object are assigned to the attributes of the Abstract API response. We fill in the fields we created earlier:
- "Annual Revenue" is assigned to the "Revenue" field.
- "Country" is assigned to the "Location" field.
- "Employee Count" is assigned to the "Employees" field.
- "Founded" is assigned to the "Founded" field.
- "Technologies" is assigned to the "Technologies" field. We configure the array values to be written as a comma-separated list in the text field by checking "Map Multiple Values" and entering a comma in "Separator".
 X
X
Finally, we activate the mapping by clicking on the "Activate" button, thereby completing the configuration in integraid.
 X
X
3.4.3. Configuration in Salesforce Flow
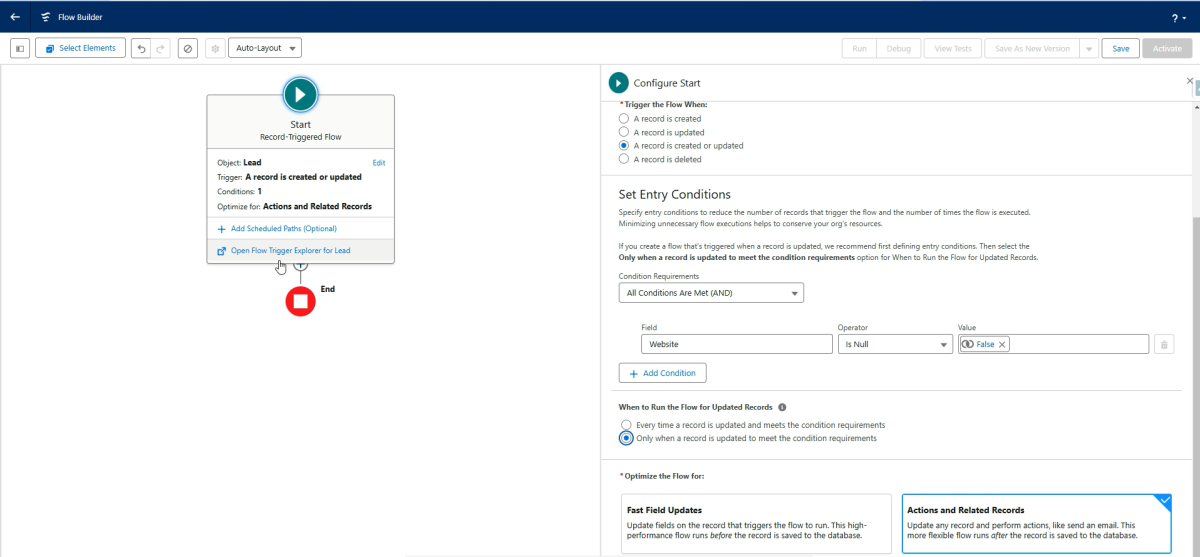
First, we create a new record-triggered flow in our Salesforce system. The flow should then be triggered when the website field in the lead object is filled for the first time.
 X
X
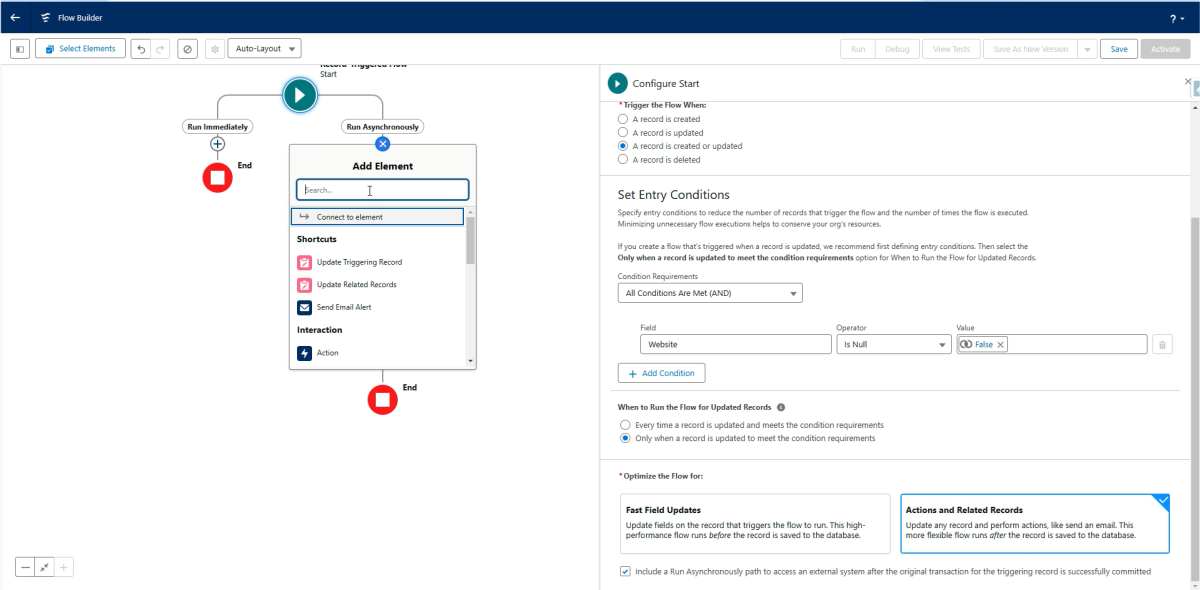
We then add an asynchronous path, as no direct callout is permitted after a data change (update/insert) in Salesforce.
 X
X
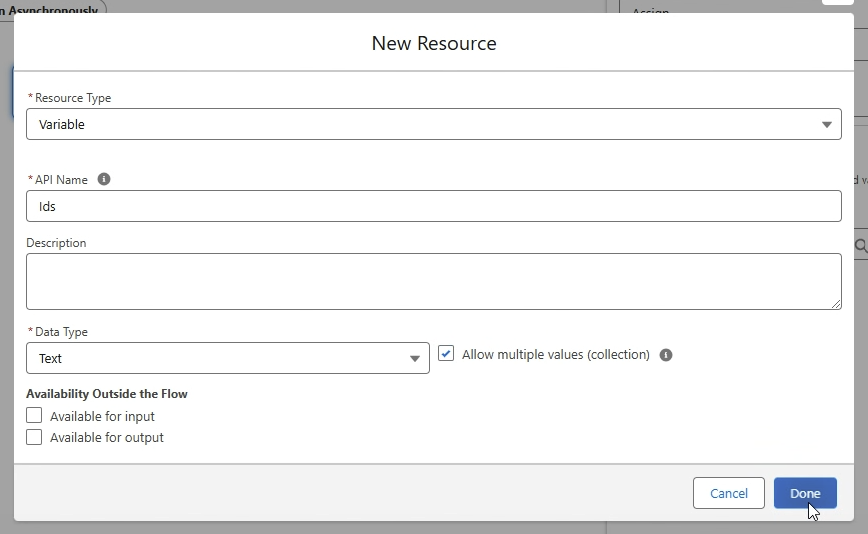
Now we need to create a variable by opening the Toolbox* at the top left of the Flow Builder and clicking on "New Resource". Here we create the following variable:
- Resource Type: Variable
- API Name: Ids
- Data Type: Text
- Allow multiple values: checked
 X
X
Next, we add an Assignment element in which the resource named "IDs" is populated with the ID of the lead that triggers the logic.
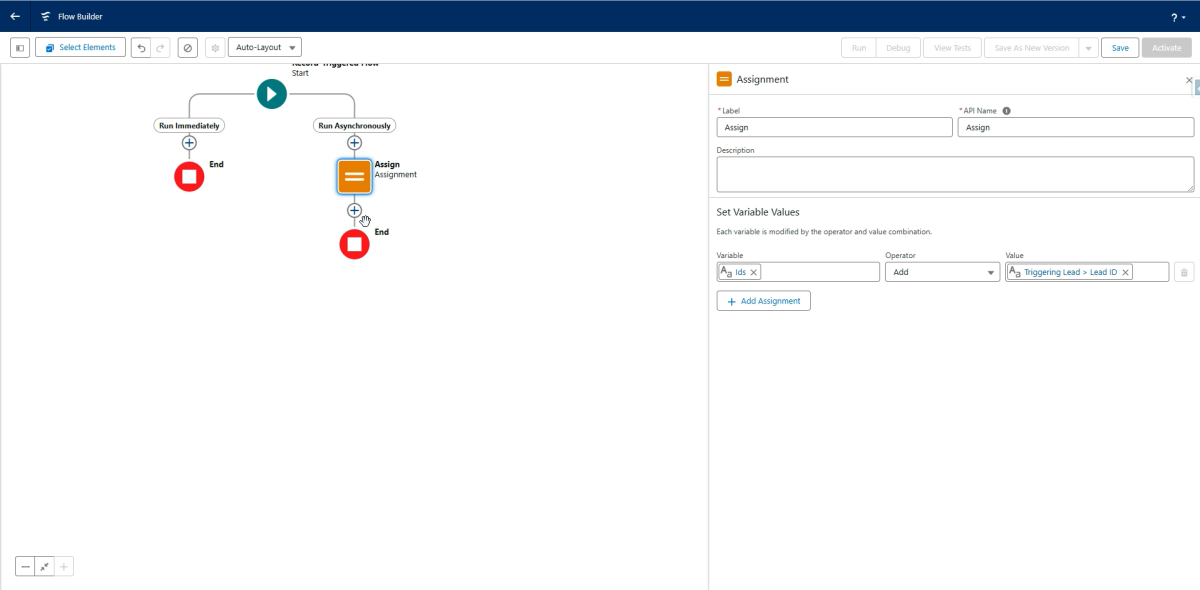 X
X
Now let's add an integraid callout. The mapping ID created earlier is passed as a parameter, and the "IDs" variable is passed as the parent ID.
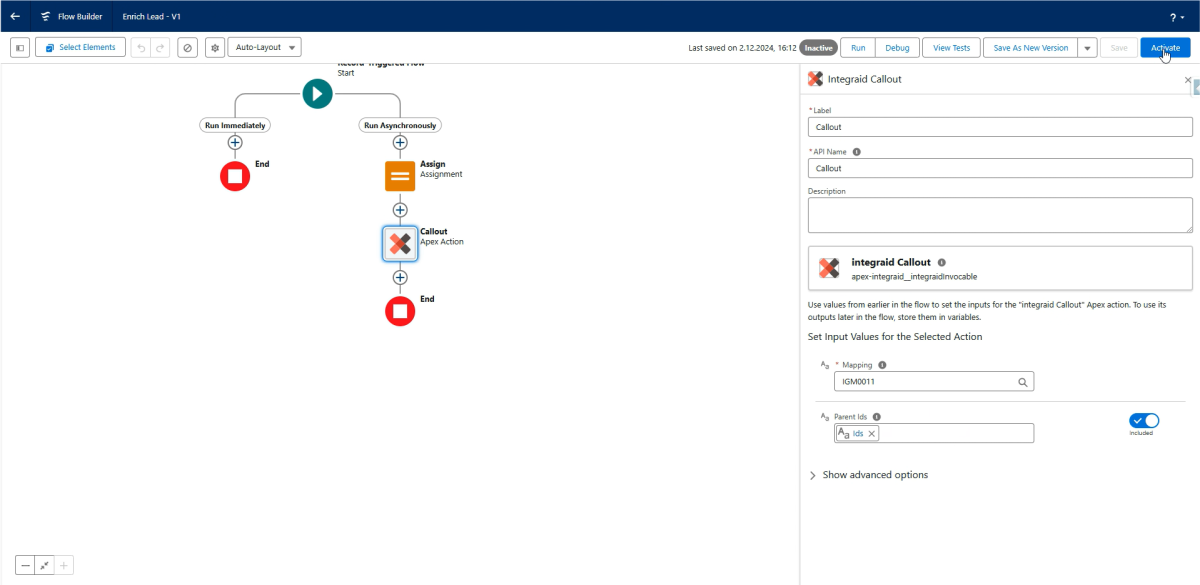 X
X
Finally, we save and activate the flow, thereby completing the configuration.
3.4.4. Result
We enter a website in the "Website" field at the lead level and reload the page. We see that all fields have been filled in correctly.
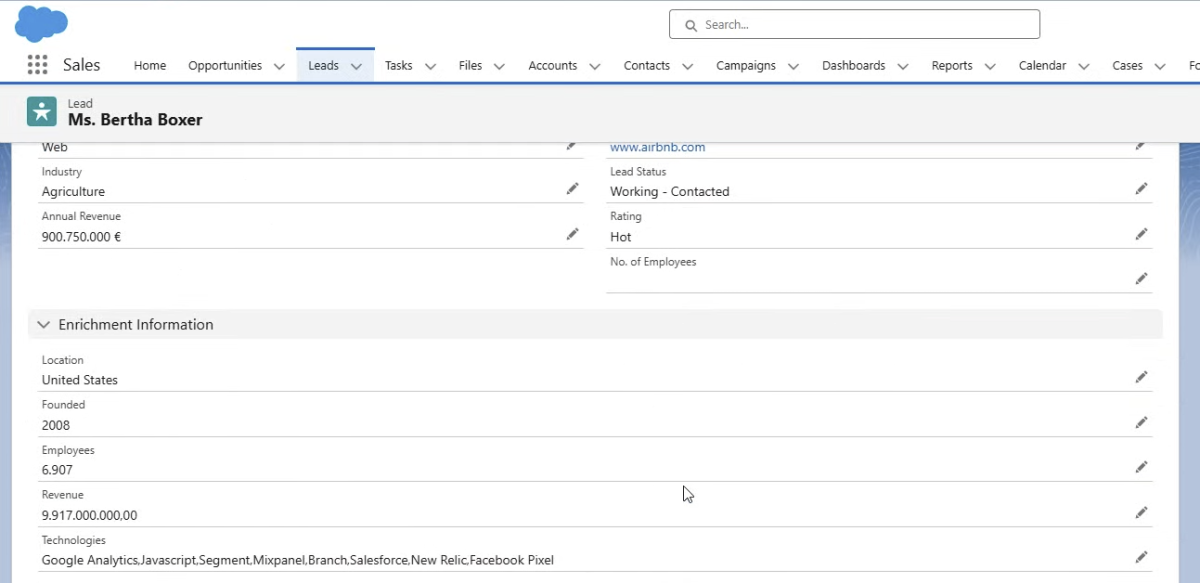 X
X
Detailed process:
1. Enter website: A user enters a website into the website field of a lead in Salesforce and saves the record.
2. Flow is triggered: The configured flow is triggered when the lead is saved.
3. Callout to Abstract API: The flow executes a callout to Abstract API via integraid.
4. Data is retrieved: Abstract API returns data for the entered website.
5. Fields are populated: The returned data is written to the corresponding fields of the lead object in Salesforce.
6. Lead is reloaded: When the lead is reloaded, the fields are populated with the data retrieved from Abstract API.
These steps allow you to integrate the information from Abstract API directly into Salesforce and enrich the lead record.
4. Error Handling
The more diverse the functionality of a system, the more complex its configuration. This means that errors are bound to happen. One of integraid's main focuses is to provide users with the best possible support in analysing configuration errors and to prevent input errors directly.
4.1. Data Entry Errors
In the event of errors due to incorrect entries or connection problems, the user will receive a corresponding message.
If no error message is displayed, it can generally be assumed that the triggered action was successful.
Some of the error messages displayed originate from connected third-party systems, the integraid application or Salesforce itself.
If an error message is unclear, we recommend consulting the Salesforce administrator responsible for the installation. If they are unable to help, simply send an email to support@integraid.com and include a screenshot of the error message so that we can assist you directly.
4.2. Errors in Actions executed in the Background
For a better overview, most of the actions performed in the background are stored in a specially created "Result" object. This allows you to track actions performed in the background or automatically.
A list of these result records can be found in the "Results" tab. If the action is successful, the message "Success" is displayed. If an error occurs, the corresponding error is displayed.
If the same error occurs in several callouts executed simultaneously, the error messages are summarized in one email, which is sent to the administrator (or the user defined under “Error Email Configuration”). In addition, there is a 15-minute time window in which no further emails with error messages for the same error are sent after an error email has been sent. If an error continues to occur, an error email will therefore only be sent every 15 minutes.
Note on freeing up storage space: To free up storage space that has been used over time by accumulated "Result" data records, you can use the "Clear" button in any list view of the "Results" tab. Please note that when you use this button, all "Result" data records are deleted, regardless of the list view currently displayed!
5. Glossary
Objects
Objects are record types within the Salesforce database. Examples of standard objects that are already created in Salesforce are accounts, contacts and opportunities. In addition to the objects that exist in Salesforce by default, any custom objects can be configured in Salesforce.
Merge fields
Merge fields allow you to access fields in the current or related records in Salesforce.
They are used to retrieve context-related information that is required for integration.
Merge attributes
Merge attributes allow you to access the values of incoming or outgoing data sent from or to the external interface. They allow you to extract values from the response or request for use or transformation in Salesforce.
Invocable
An invocable in integraid is a reusable piece of logic that can be called via other systems, such as flows. An invocable can execute a mapping and thus initiate communication with an external interface.
Array
An array is an ordered list of elements. In programming and data formats such as JSON, an array is used to store multiple values under a single name. Arrays can contain simple data types such as numbers or strings, but also more complex objects or other arrays. When integrating with external interfaces, arrays can appear in requests or responses. In integraid, an array can be treated as a set of values that are either sent from Salesforce to an interface or received from the interface and stored in Salesforce.
JSON (JavaScript Object Notation)
JSON is a lightweight data format that is often used to transfer data between a server and a web application. It is based on a simple text structure consisting of key-value pairs. JSON can contain simple data types such as strings, numbers, Boolean values and arrays, but also more complex objects.